The first time I placed a cup on someone’s upper back and watched the skin rise into it, I thought I understood what I was doing. I had read the theory. I knew the names. But that moment of actual suction — the colour change, the person’s breath slowing — told me I hadn’t understood anything yet.
If you’re looking to learn cupping therapy, the honest answer is that the technique itself is only a fraction of what makes it work. The rest is knowing where to place the cups, why those locations matter, and what you’re actually trying to achieve for each condition — and that’s where most beginners stall before they ever get traction.
- Cupping therapy works best when placement is tied to specific acupoints, not just areas of pain — point selection changes outcomes entirely.
- The difference between dry and vacuum cupping isn’t just equipment — it’s the level of control you have over suction intensity, which affects who you can safely treat.
- Most beginners over-cup: too many cups, too long, too soon — and the side effects they cause undermine any benefit.
What Cupping Therapy Actually Is (And What It Isn’t)
Cupping therapy is a physical intervention that uses negative pressure — suction — to lift soft tissue away from the body, drawing increased blood flow into targeted areas and creating a decompression effect on the fascia and muscle layers underneath. Unlike massage, which compresses tissue, cupping pulls it upward, which is why the sensation and the physiological effect feel completely different.
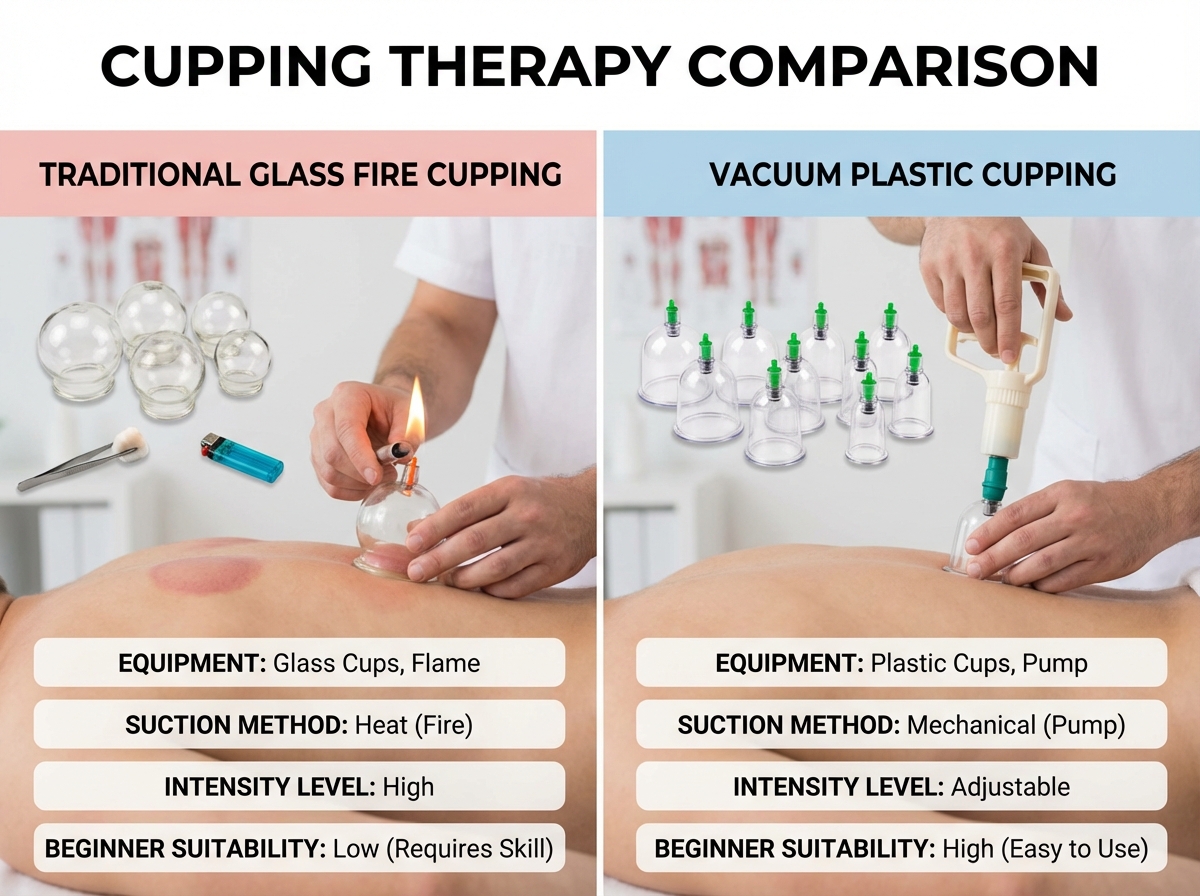
There are three main forms most practitioners work with:
| Type | Method | Best For | Control Level |
|---|---|---|---|
| Traditional glass cupping | Flame removes oxygen to create suction | Deep tissue, chronic conditions | Low — fixed suction |
| Vacuum (plastic) cupping | Hand pump creates suction | Beginners, adjustable pressure | High — precise control |
| Running cupping | Cups moved along oiled skin | Broad muscle areas, circulation | Medium |
For anyone starting out, vacuum cupping is where you want to begin. Not because it’s easier — it’s because it’s controllable. You can adjust the suction mid-session without removing the cup. Glass fire cupping produces a deeper, more intense result, but the margin for error is narrow and the prep time is unforgiving.
Three Things Beginners Get Wrong Before They Even Start
- Cupping is not the same as acupuncture, but it uses acupuncture points — confusing the two leads to random cup placement with inconsistent results.
- The marks left on the skin (ecchymosis) are not bruises from damage — they’re diagnostic signals that show stagnation, and their colour tells you something about the tissue underneath.
- Contraindications are not optional reading — applying cups over varicose veins, broken skin, or on patients with blood disorders is how people get hurt.
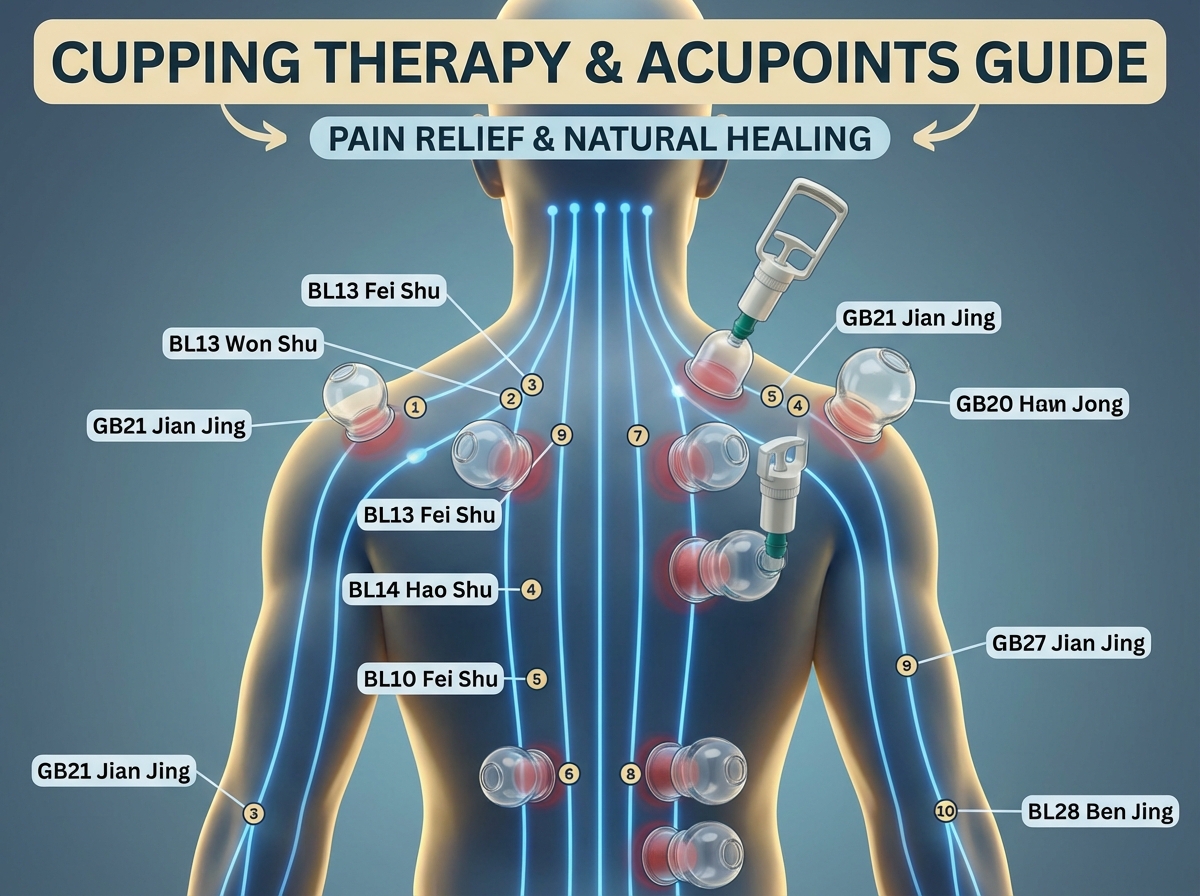
The Real Learning Curve: Understanding Acupoints
Here’s where most people spend the first month just spinning. You can learn cupping technique in an afternoon. You cannot learn acupoint logic in a weekend — and that’s exactly what catches beginners off guard.
The 15 points that matter most in cupping practice aren’t random. They’re selected because each one sits at the intersection of multiple meridian pathways or at a node where blood flow is particularly responsive to suction. When you first encounter names like GB-20, ST-36, or BL-23, they sound like coordinates on a map you’ve never seen. That disorientation is normal.
The breakthrough comes when you stop trying to memorize locations in isolation and start tying each point to a condition. GB-20 (Fengchi) sits at the base of the skull in the hollows behind the neck muscles — and once you’ve placed a cup there for someone with a migraine and watched their jaw unclench, you never forget where it is. The location locks in because the function locked in first.
SP-6 (Sanyinjiao) is the kind of point that surprises people because it’s on the lower leg — and yet it’s used for insomnia, stress, and hormonal regulation. That apparent disconnect is actually the key to understanding how meridian logic works: the pathway runs up through the leg into the abdomen and chest. Working the distal point shifts the entire channel.
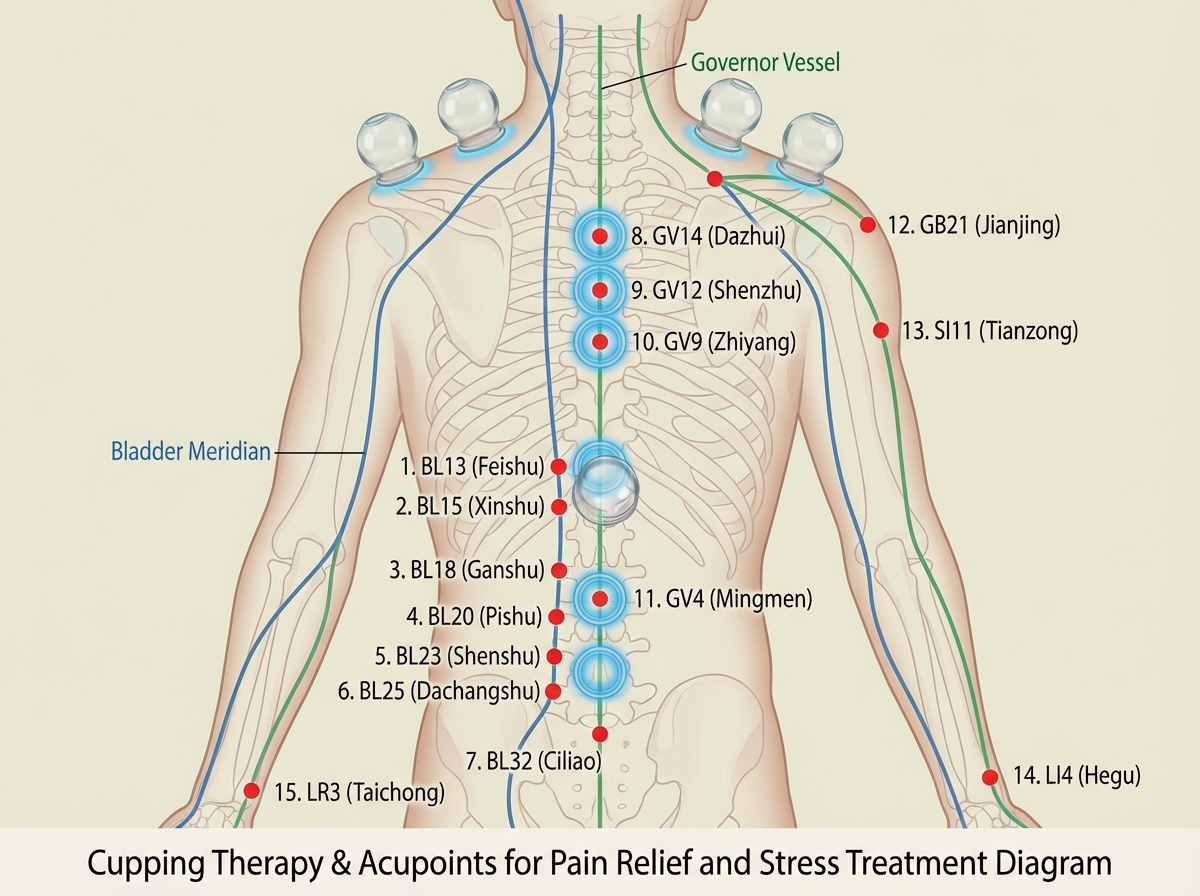
The 15 Points That Form the Practical Core of Cupping Therapy
Once you start treating real conditions, you find yourself returning to the same cluster of points repeatedly. These aren’t the full scope of what exists — they’re the points with the clearest clinical application and the most consistent results for common complaints.
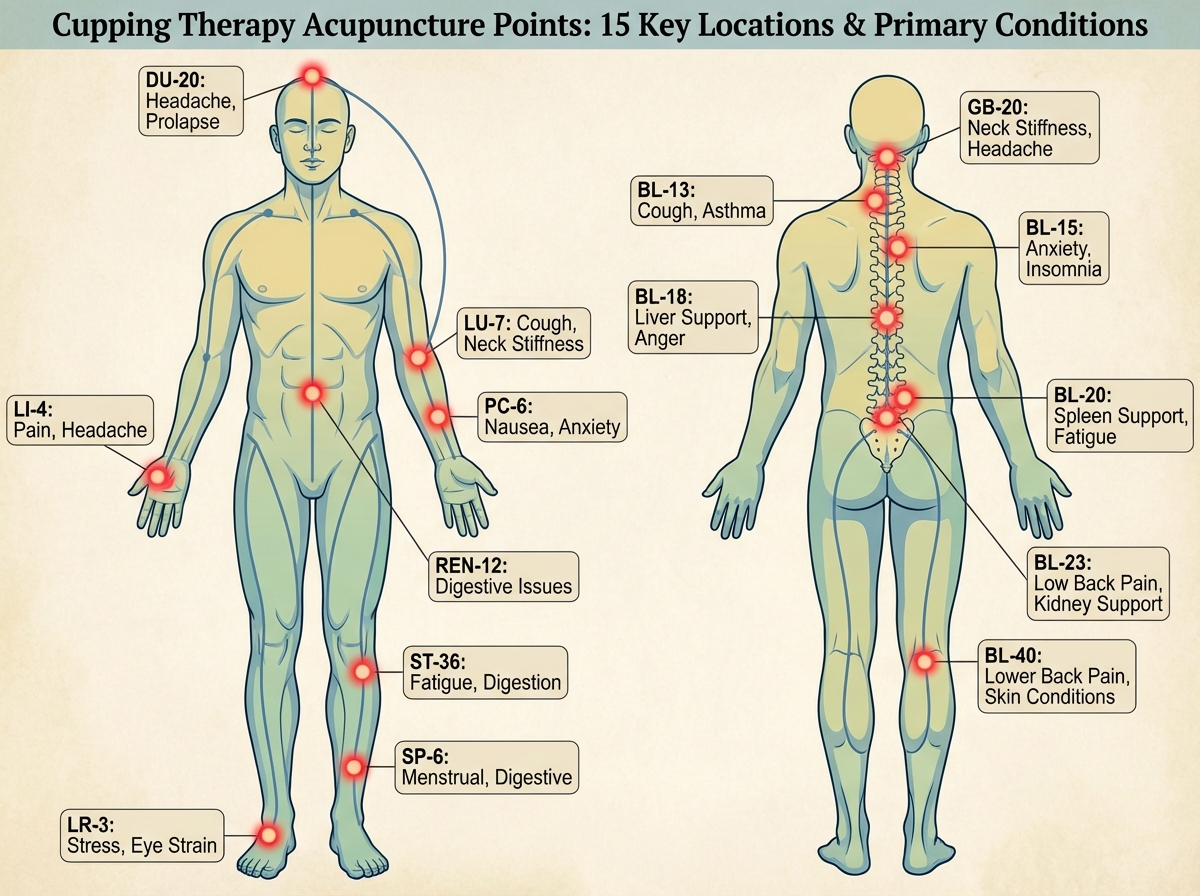
For head, neck, and neurological symptoms:
- GB-20 (Fengchi) — Base of skull, occipital hollows. Primary point for migraines, neck stiffness, and eye tension.
- DU-20 (Baihui) — Crown of the head. Used for insomnia, anxiety, and mental clarity.
- SI-3 (Houxi) — Back of the hand at the fifth metacarpal. Releases the neck and spine through the Small Intestine meridian.
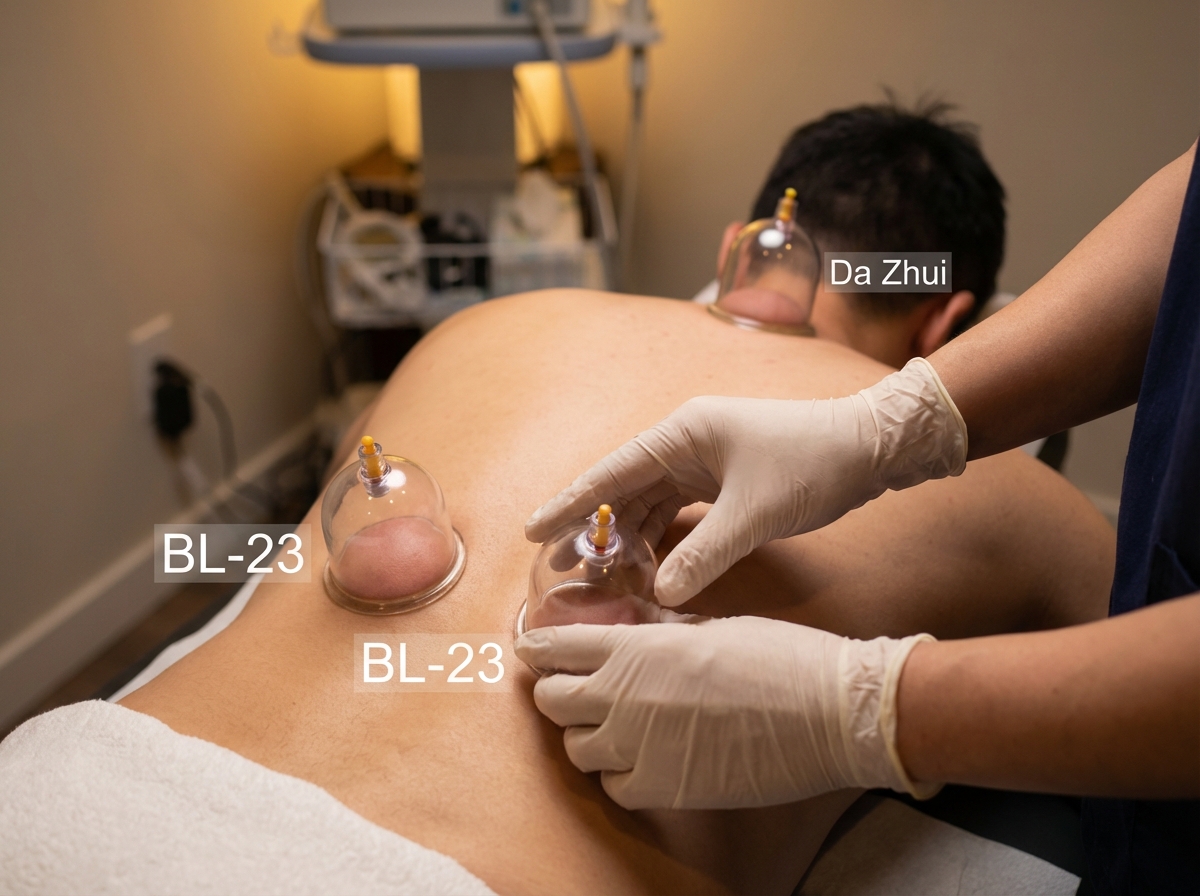
- Da Zhui (GV14) — Below the C7 vertebra. Clears heat, boosts immunity, and addresses upper back tension.
For back, spine, and lower body:
- BL-23 (Shenshu) — Lateral to L2. The kidney back-shu point — essential for lower back pain and kidney deficiency patterns.
- BL-40 (Weizhong) — Centre of the knee crease. Called the “command point” for the back — surprisingly effective for lumbar pain.
- GB-34 (Yanglingquan) — Below the knee at the fibula head. Governs tendons and ligaments — used for hip, leg, and joint conditions.
- KD-1 (Yongquan) — Centre of the sole. Grounds energy, calms the mind, reduces high blood pressure.
For immune, digestive, and systemic conditions:
- ST-36 (Zusanli) — Four fingers below the kneecap, one finger lateral to the tibia. The most widely used point in all of East Asian medicine for immune function, fatigue, and digestion.
- SP-6 (Sanyinjiao) — Three fingers above the inner ankle. Crosses three yin meridians — used for insomnia, stress, menstrual irregularity.
- CV-12 (Zhongwan) — Midline of the abdomen, halfway between navel and sternum. Central to digestive conditions.
- LU-1 (Zhongfu) — Lateral chest below the clavicle. The lung alarm point — respiratory and immune support.
- SJ-5 (Waiguan) — Two fingers above the outer wrist. Clears heat and supports the immune system.
For pain and inflammation anywhere in the body:
- LI-4 (Hegu) — The webbing between thumb and index finger. One of the most powerful analgesic points in the body — general pain, headaches, and immune function.
- LI-11 (Quchi) — Outer elbow crease. Reduces fever, clears heat, relieves upper body pain.
How Conditions Actually Map to Treatment
The biggest mistake people make when learning cupping therapy for specific conditions is treating it like a recipe — apply cups here, wait, done. That mechanical approach misses the reasoning entirely, and when the results are inconsistent, they don’t know why.
For migraine, the treatment isn’t just GB-20 at the neck. You’re working the chain from the upper back (Da Zhui) up through the occipital points and sometimes adding LI-4 as a distal analgesic. The logic is that the Gallbladder meridian runs along the side of the head — if you only work the head, you’re treating the symptom. If you trace the channel to its origin, you’re treating the pattern.
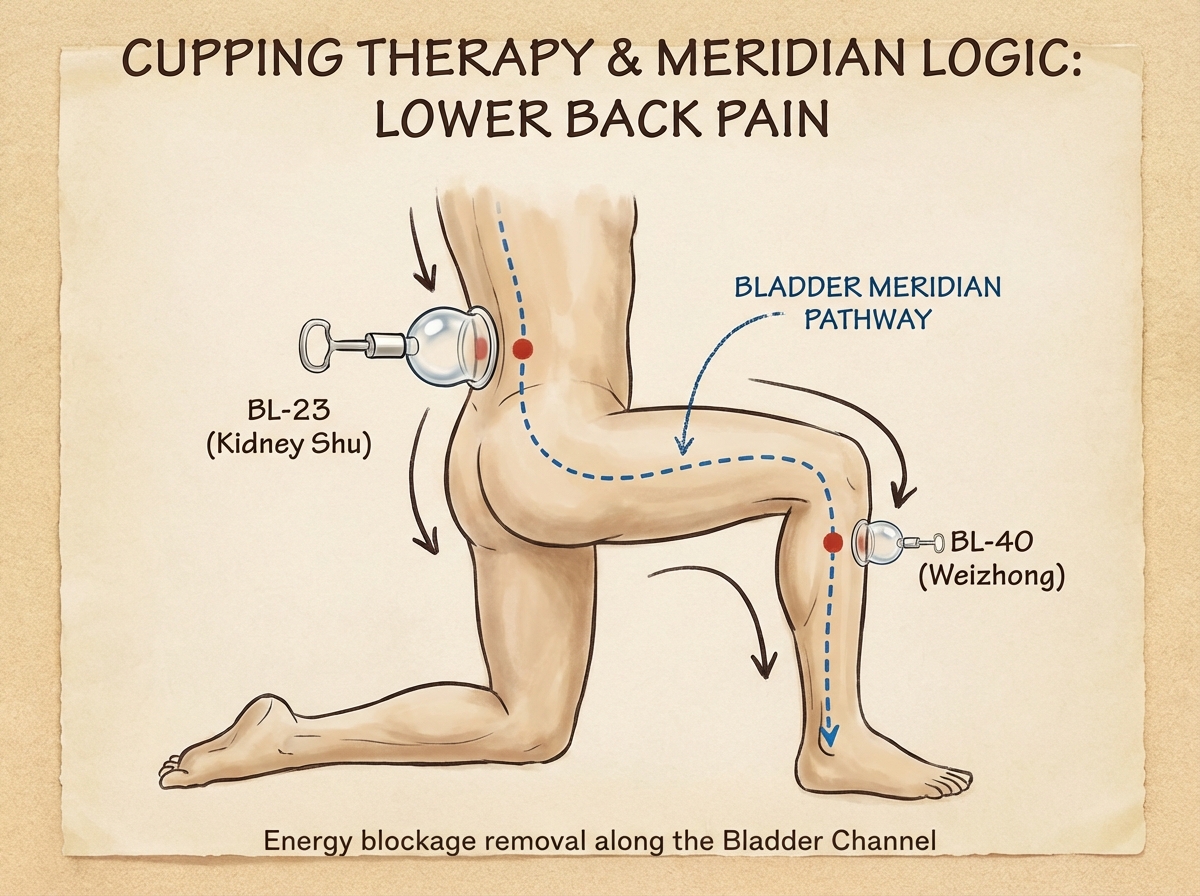
For lower back pain, BL-23 is the anchor point — but BL-40 at the knee crease often does the heavy lifting. The Bladder meridian runs the full length of the back and down the posterior leg, which is why a point in the knee joint can dramatically reduce lumbar pain. This is also why knowing the meridian trajectories isn’t optional theory — it’s the operating system for everything you place.
Stress and insomnia are where cupping therapy genuinely surprises people who come in as skeptics. DU-20 at the crown, SP-6 at the lower leg, and KD-1 at the sole work together to bring rising energy downward — what Chinese medicine calls anchoring the yang. When someone lies down with three cups placed on those points and falls asleep during the session, it stops being abstract. The physiology is real: sustained suction on the parasympathetic nerve-rich zones of the lower limbs and scalp creates measurable relaxation responses.
The Safety Layer You Cannot Skip
There’s a section of any serious cupping education that feels like tedium until you see what happens when it’s ignored. Contraindications, hygiene, and duration — these aren’t bureaucratic add-ons. They’re where real harm lives.
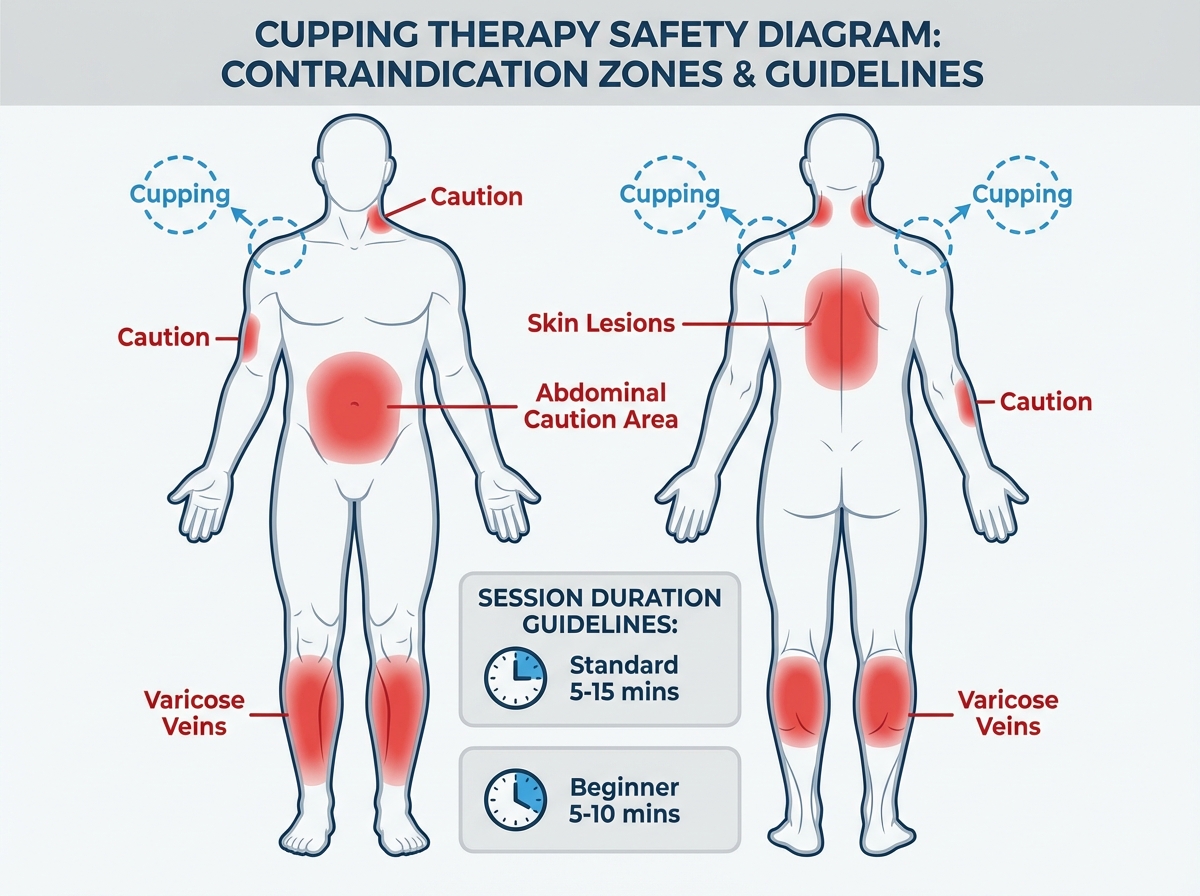
The most important boundaries to hold: never cup over open wounds, active inflammation, varicose veins, or skin disorders. Never apply cups to anyone with bleeding disorders, on blood thinners, or in an acute fever state. The abdominal region requires extreme caution — and completely off-limits during pregnancy.
Hygiene protocol matters beyond the obvious. Cups that aren’t sterilized between patients carry infection risk regardless of technique. But the detail most beginners overlook is skin prep — cupping on skin without appropriate oil (for moving techniques) or on sensitive skin without a gentle introduction creates unnecessary bruising and undermines trust in the treatment.
Session duration is where over-enthusiasm causes the most problems. Ten to fifteen minutes on a single set of cups is typically the maximum for most conditions. Leaving cups longer doesn’t deepen the effect — it increases the intensity of the ecchymosis marks and can tip into tissue damage. Shorter and more frequent sessions consistently outperform one long session.
What a Learning Timeline Actually Looks Like
| Stage | What You’re Building | Estimated Time |
|---|---|---|
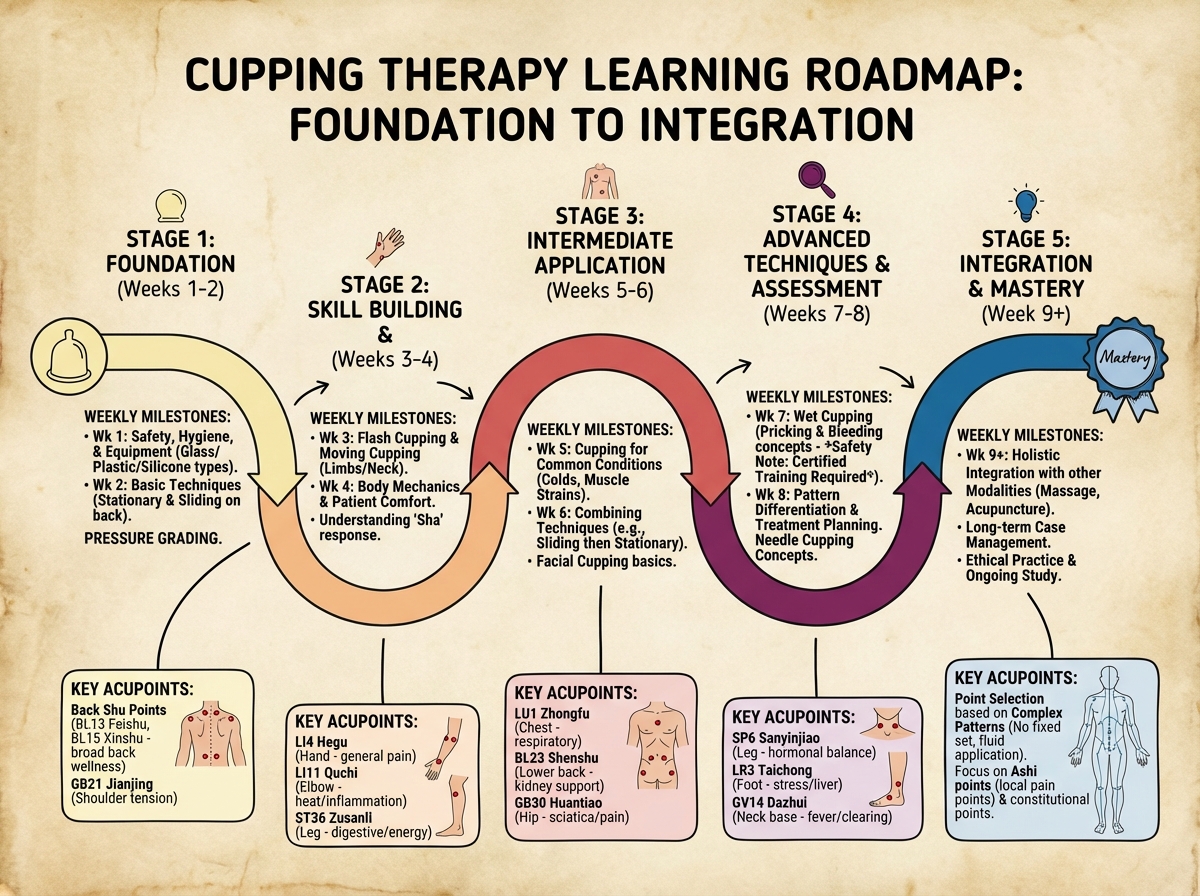
| Foundation | Cupping types, equipment, basic contraindications | Week 1–2 |
| Point mapping | Locating and memorizing 15 core acupoints | Week 2–4 |
| Condition protocols | Matching points to conditions: pain, stress, insomnia, immune | Week 4–6 |
| Practical application | Supervised or self-practice sessions, pressure calibration | Week 6–10 |
| Integration | Combining points fluidly, reading skin response, adjusting in-session | Week 10–16 |
| Total | From zero to confident practitioner | 3–4 months |
The order in that table matters more than the speed. Practitioners who jump to protocols before they’ve internalized point locations make placement errors that compound — a cup 2 cm off on BL-23 hits a different structure entirely. If you’re still at week eight when others have moved to week four, you’re not behind. You’re building something stable.
The Moment the Practice Actually Becomes Yours
There’s a threshold in learning cupping therapy with acupoints that’s hard to describe until you cross it. On one side, you’re consulting your notes mid-session, second-guessing your placement, counting the minutes. On the other side, you’re reading the person’s body — noticing where the skin lifts differently, adjusting suction based on tissue response, moving through a session with a kind of fluency that didn’t exist before.
That transition doesn’t happen from studying more. It happens from treating more people with the same conditions repeatedly until the patterns become obvious. The first five times you treat a neck pain patient, you’re executing a protocol. By the fifteenth time, you’re practicing a skill.
For anyone who also works at the intersection of traditional medicine and professional services, the practical knowledge in cupping therapy overlaps naturally with other areas of wellness and alternative healing — a territory worth understanding deeply if you’re building a practice or wellness service from scratch.
What Looking Back Actually Teaches You
If I could talk to myself at the start of this learning path, the note would be short: stop trying to learn all 15 points before you understand what suction feels like to the person receiving it. Get the sensory foundation first. Everything conceptual is easier to build on top of lived experience than the other way around.
Here are the actions that accelerated everything once I stopped overthinking and started doing:
- Practice point location on yourself first — ST-36, LI-4, and GB-20 are accessible on your own body; knowing their feel before treating someone else removes hesitation from your hands.
- Start every new condition with one cup, not five — placing a single cup on BL-23 and watching the response tells you more than placing six cups and getting noise.
- Photograph ecchymosis marks systematically — colour and pattern variation across sessions is diagnostic data; your memory won’t hold it accurately.
- Time your sessions with an external timer — your perception of ten minutes under focus is not reliable; over-cupping from time drift is the most common beginner error.
- Learn Da Zhui early and use it often — GV14 is the single most versatile point in the upper body for beginners; it bridges immune, neck, and neurological protocols.
- Treat the same condition three times in a row before moving to a new one — depth of understanding in cupping therapy comes from repetition within a condition, not breadth across conditions.
- Keep a session log that includes cup placement, duration, and patient feedback — patterns in that log will teach you more than any theory review.
- Know your contraindications cold before your first live session — not as a checklist to tick, but as instinct; the moment you hesitate on a contraindication in front of a client is the moment you lose their confidence.
Leave a Reply