The first time I sat down to study anesthesia coding, I thought I just needed to memorize CPT codes. I was wrong. What tripped me up — and what trips up almost everyone who comes from a coding background without clinical exposure — was anatomy. Not the broad, textbook anatomy you vaguely remember. The precise, regionally specific anatomy that explains why a spinal block is placed at L3-L4, why the popliteal fossa matters for lower-leg procedures, and why the brachial plexus determines which nerve approach an anesthesiologist chooses for shoulder surgery.
If you’re looking to learn anatomy for anesthesia, the honest truth is that you don’t need to become a clinician — but you do need to understand the body the way a clinician thinks about it: regionally, spatially, and in the context of real procedures. Once that shift happens, the coding decisions stop feeling arbitrary and start making complete sense.
- Anesthesia coding accuracy depends heavily on understanding which anatomical region is being targeted, not just the procedure name.
- Regional anesthesia — including spinal, epidural, and nerve blocks — requires knowing the spinal cord anatomy and vertebral levels to code correctly.
- Most CPC AAPC exam gaps in anesthesia come from anatomy blind spots, not code lookup failures.
What “Anatomy for Anesthesia” Actually Means
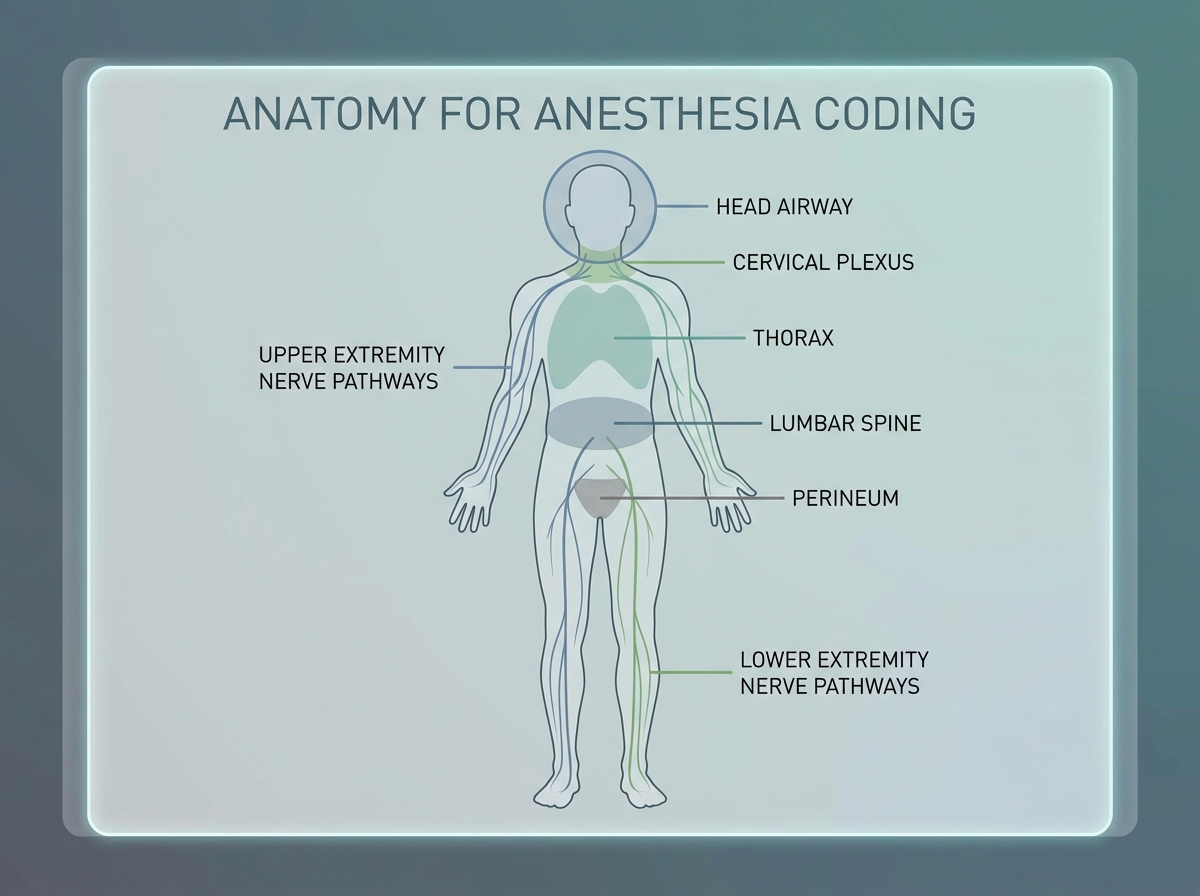
Anesthesia anatomy is not the same as gross anatomy. It’s a filtered version — the structures, spaces, and landmarks that matter when someone is delivering or coding for pain management, sedation, or surgical anesthesia. You’re not memorizing every muscle in the forearm. You’re learning which nerve runs through the carpal tunnel, how deep the epidural space sits from the skin surface at different vertebral levels, and what the cricothyroid membrane has to do with airway management.
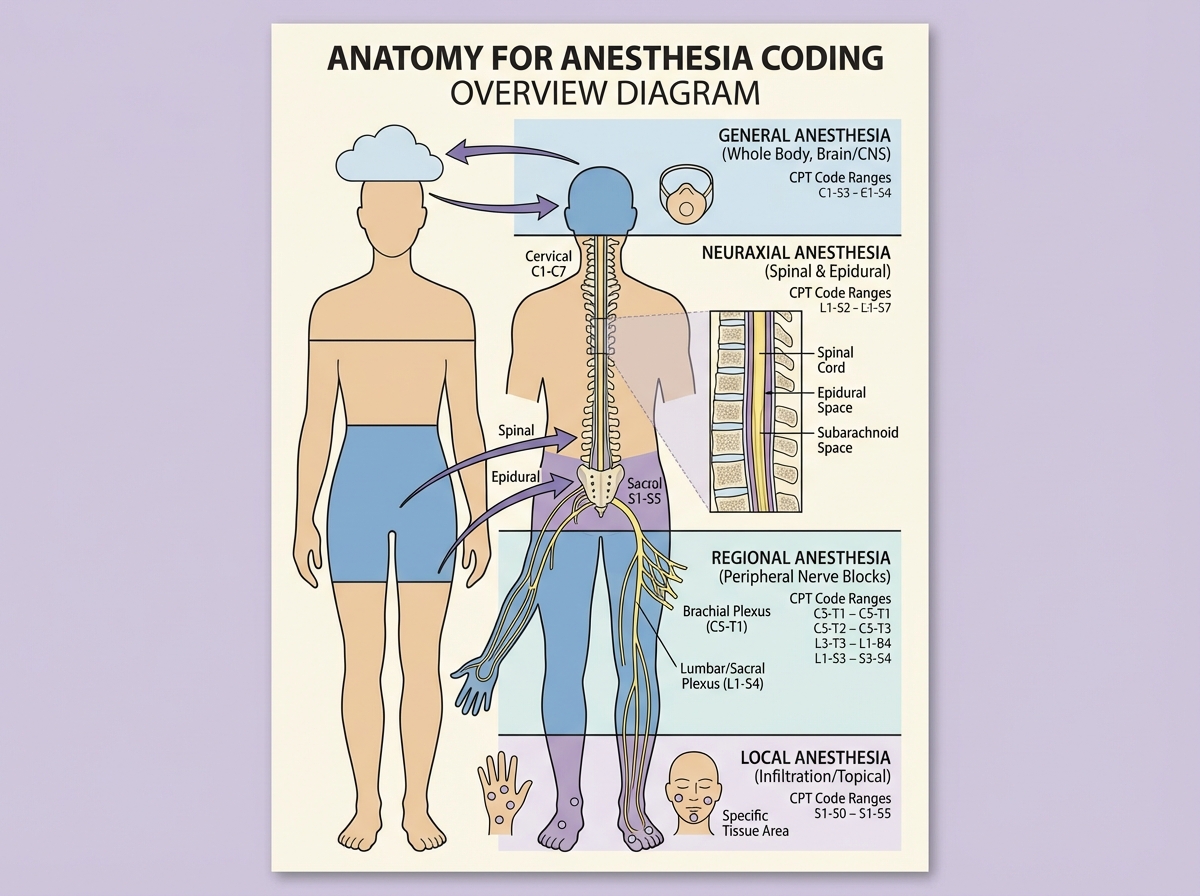
The four core anesthesia types each map to specific anatomy:
| Anesthesia Type | Primary Anatomical Target | Common Procedures |
|---|---|---|
| General | CNS, airway (trachea, bronchi) | Thoracic, abdominal, cranial |
| Regional – Spinal | Subarachnoid space (L3–L4/L4–L5) | Lower abdominal, obstetric, lower extremity |
| Regional – Epidural | Epidural space, spine | Labor, lumbar, thoracic procedures |
| Local/Nerve Block | Peripheral nerves, soft tissue | Extremities, perineum, minor surgical sites |
| Sedation | CNS (monitored, not ablative) | Radiological, endoscopic, minor procedures |
Three things that surprise people when they first approach this:
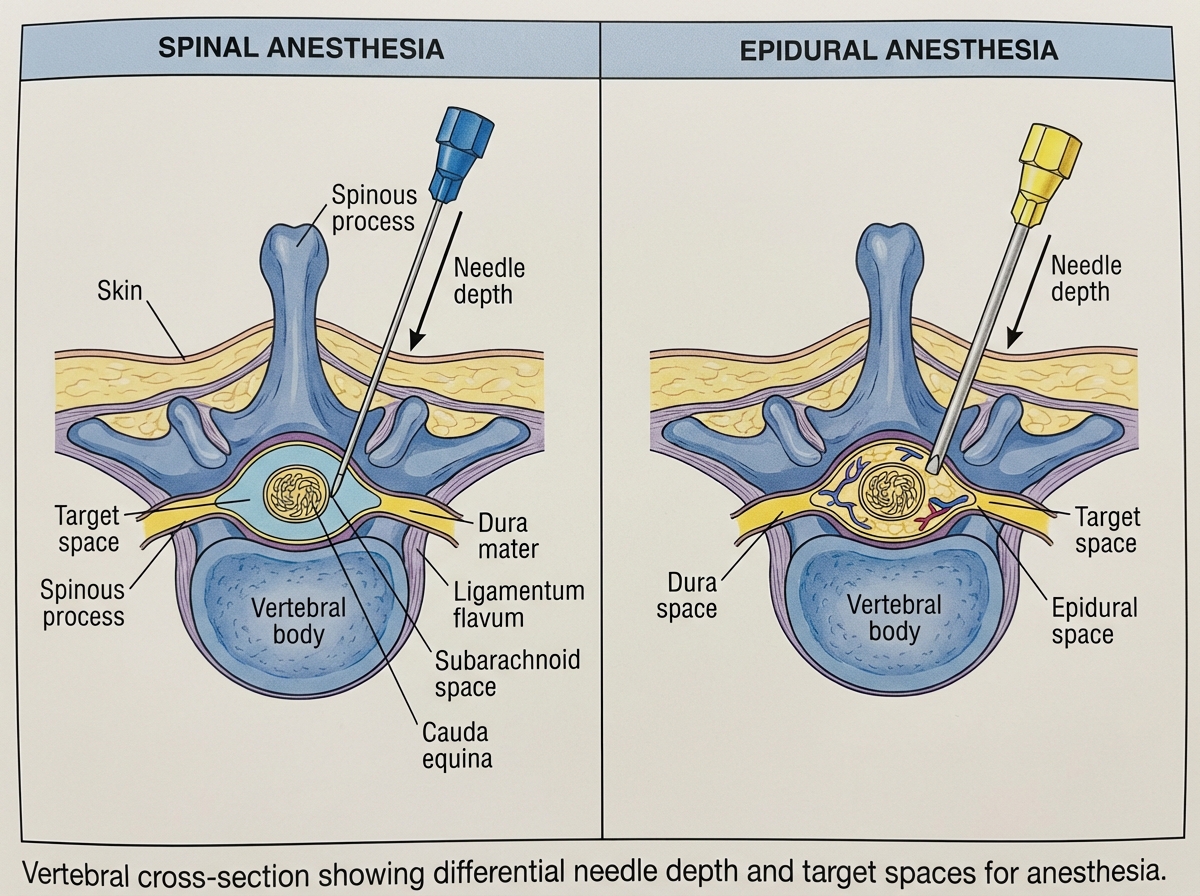
- The epidural space is not a fluid-filled cavity — and that distinction changes everything about how you interpret procedure notes.
- Spinal anesthesia and epidural anesthesia are not interchangeable terms in coding; the anatomical target is different, and so is the code.
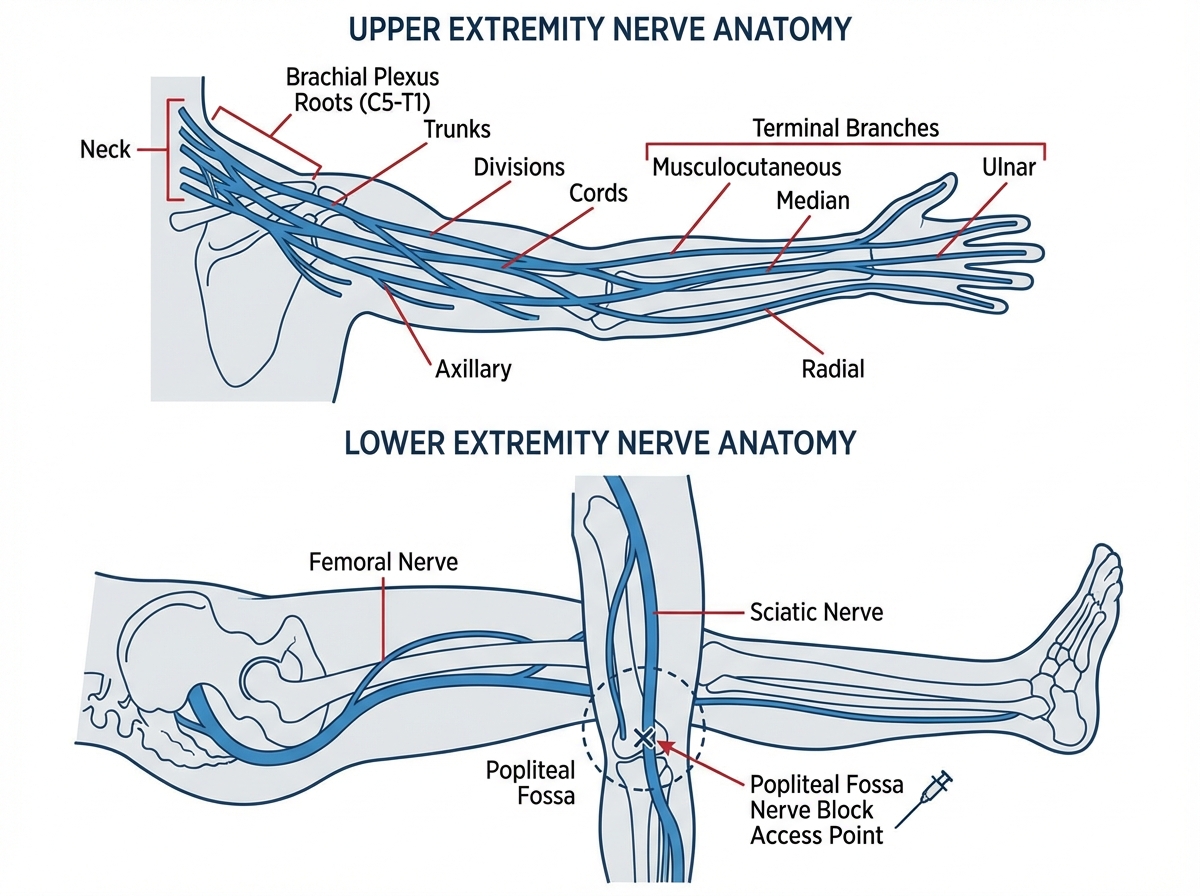
- Regional anesthesia for the upper extremity often starts at the neck — the brachial plexus originates at cervical roots, not the shoulder.
How Long Does It Take to Build Functional Anesthesia Anatomy Knowledge?
| Stage | Content | Time |
|---|---|---|
| Foundation | Human anatomy overview, what anesthesia is, history and types | 1–2 days |
| Core anesthesia types | General, regional, spinal/epidural, sedation, local — mechanisms and anatomy | 3–5 days |
| Regional body anatomy | Head, neck, thorax, spine, spinal cord | 5–7 days |
| Extremity and perineum anatomy | Upper/lower limb, pelvis, obstetric anatomy | 4–6 days |
| Procedural application | Tracheostomy, bronchoscopy, radiological procedures, burn excisions | 2–3 days |
| Clinical case integration | Tying anatomy to real procedure scenarios and coding rationale | 3–5 days |
| Total | Full working knowledge for coding application | 3–4 weeks |
The order matters more than the pace. You can’t meaningfully understand spinal anesthesia until you’ve built a mental model of the vertebral column and the spaces within it. Moving too fast through the foundational anatomy sections to get to the “interesting” procedure content is the most common mistake people make. Being slower than four weeks is completely normal — it usually means you’re actually integrating the material rather than just watching it go by.
Where Most People Get Stuck Before They Even Start
The single biggest mistake people make when studying anatomy for anesthesia coding is trying to learn anatomy in isolation from clinical context. You sit with a textbook diagram of the brachial plexus, memorize C5 through T1, and feel like you’ve accomplished something. Then you see a procedure note for an interscalene block and have no idea what you’re looking at. The anatomy felt abstract because it was abstract — there was no procedure attached to it, no reason for the nerve to matter.
The fix is to always study anatomy in pairs: structure + procedure. The subarachnoid space means nothing until you pair it with a spinal injection. The popliteal fossa becomes memorable the moment you understand it’s the access point for a sciatic nerve block in lower leg surgeries. Every anatomical landmark should answer the question: what does someone do here, and why here?
For medical coders especially, this is a mindset shift. Coding training tends to be code-first: find the right CPT, apply the right modifier. Anesthesia flips that. The anatomy generates the code, not the other way around. Until that clicks, the codes feel like arbitrary numbers.
The Head and Neck: More Relevant Than You Expect
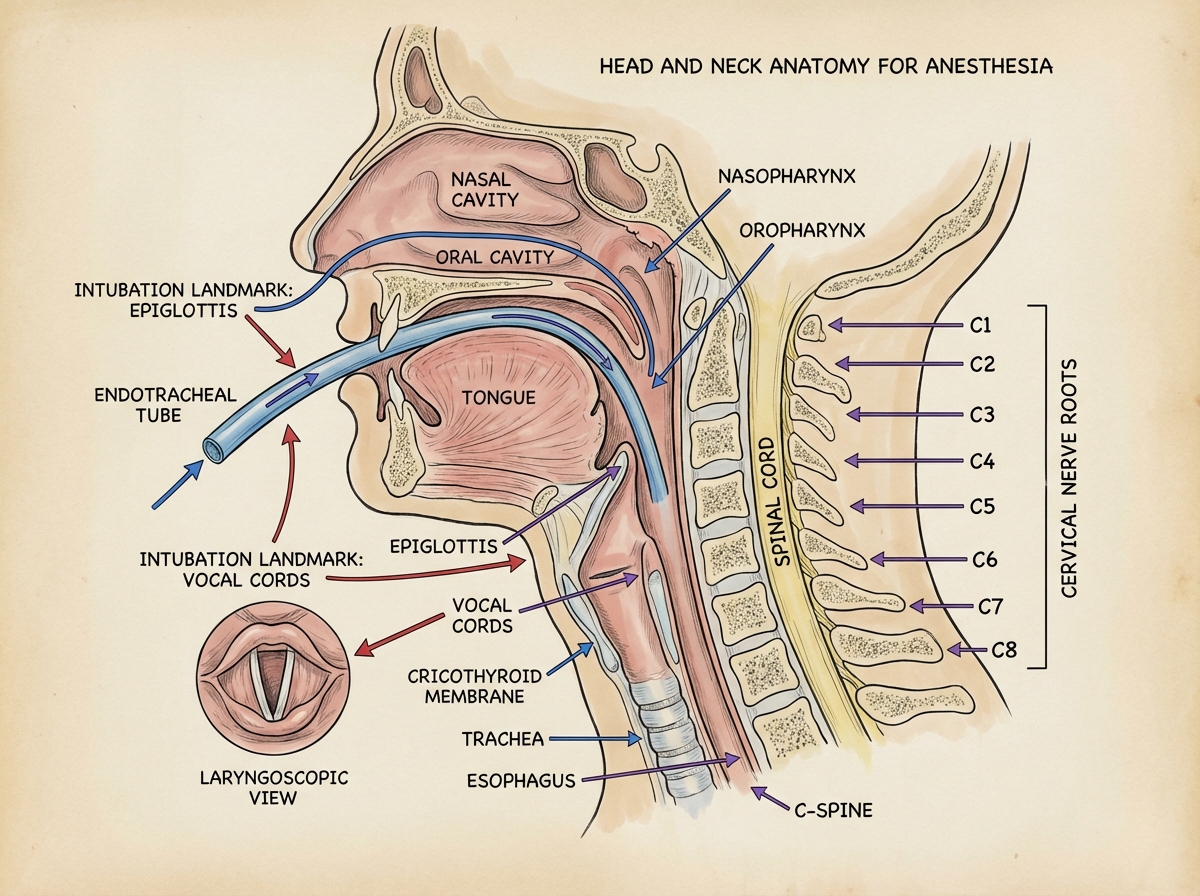
When people think of anesthesia anatomy, they jump straight to the spine. But head and neck anatomy carries more weight than most coders anticipate — especially because of airway management. The structures that matter here aren’t the ones you’d study for a neurology rotation. You’re focused on the larynx, the trachea, the cricothyroid membrane, the relationship between the hyoid bone and the thyroid cartilage, and — critically — the passages that make intubation possible or complicated.
Four separate lessons on head anatomy isn’t excessive. The airway alone — from nasal passages through the pharynx, past the epiglottis, into the glottis and vocal cords — is a sequenced structure where each segment has a distinct clinical relevance. Coders who understand why the nasopharynx is anatomically distinct from the oropharynx can read operative notes for nasal or sinus procedures and immediately understand why the anesthesia approach differs.
Neck anatomy adds another layer: cervical nerve roots, the carotid sheath, the anterior and posterior triangles, and the cervical plexus. Regional anesthesia for head and neck procedures — including nerve blocks for dental and maxillofacial work — lives here. Three lessons on neck anatomy seems like a lot until you’re coding a cervical plexus block and suddenly every landmark makes sense.
The Spine Is the Centerpiece — Treat It That Way
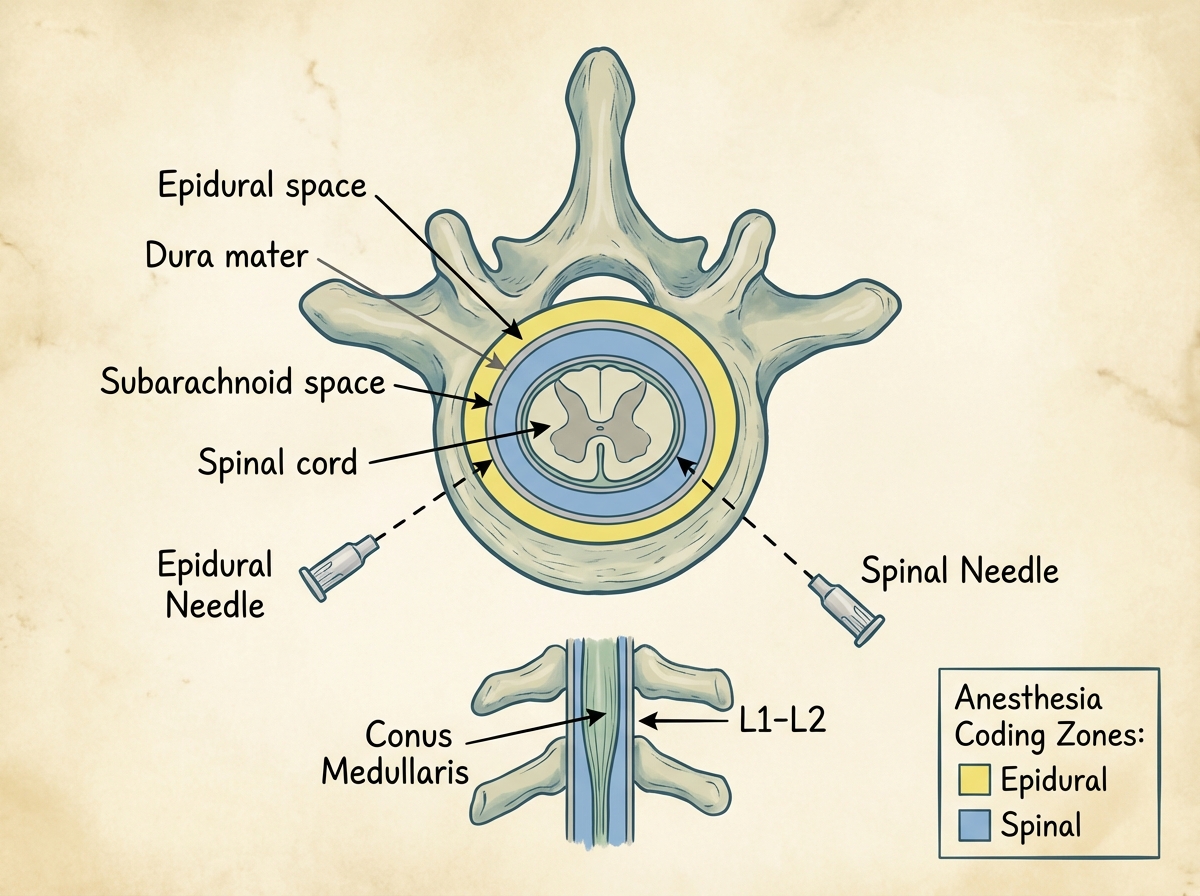
Everything about regional anesthesia for the torso and lower body runs through the spine. Spinal anesthesia for anesthesia coding is probably the most examined topic in the CPC AAPC context, and it’s also the area where anatomical understanding separates coders who guess from coders who know. The distinction between the subarachnoid space and the epidural space is not a fine print detail — it determines whether you’re looking at a spinal or an epidural code, and those are not the same.
The vertebral column has to be understood as a three-dimensional structure. Not just the vertebral levels — lumbar, thoracic, cervical — but the spaces: the epidural space, the subarachnoid space, and the interspinous ligaments that the needle passes through to reach them. The conus medullaris ending around L1-L2 is why spinal injections are placed at L3-L4 or below — below the cord itself, in the cauda equina region. Coders who know this don’t second-guess lumbar puncture placement in operative notes; they recognize it instantly.
Obstetric anatomy connects directly to this. The epidural space at the lumbar level is the target for labor epidurals. Understanding the female pelvis — the inlet, the outlet, the relationship between the sacrum and the pelvic floor — gives the spinal and epidural anatomy a clinical anchor that makes it stick.
Thorax Anatomy and Why the Lungs Change Everything
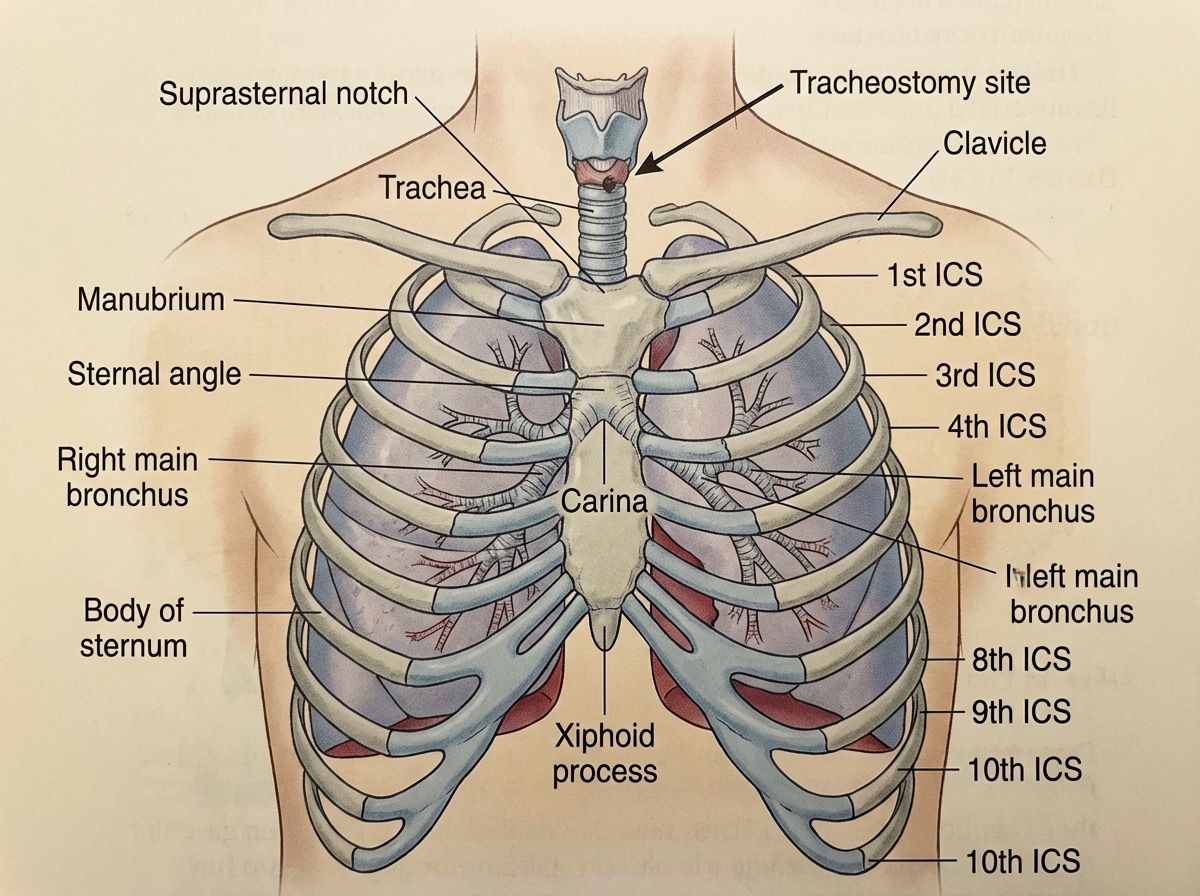
Thoracic anatomy in anesthesia isn’t just about open-chest surgery. It’s about understanding what general anesthesia actually does to the airway system — and why procedures like tracheostomy and bronchoscopy have their own anatomical logic. Surface anatomy of the thorax matters for landmark-based procedures. Rib counting, intercostal spaces, the position of the carina — these are the coordinates anesthesiologists and proceduralists work from.
There’s a moment in studying thoracic anatomy where the paranasal sinuses appear and the connection to anesthesia isn’t immediately obvious. But ENT procedures — sinus surgeries, nasal polyp removals — require anesthesia, and understanding the anatomy of the sinuses and their relationship to the nasal airway is exactly the clinical context that makes coding those cases accurate. It also prevents the classic error of confusing an intranasal procedure with an intraoral one when both appear in the same operative report.
Bronchoscopy deserves its own attention. The bronchial tree — right and left main bronchi, the lobar divisions, the relationship to the carina — is essential context for understanding why bronchoscopy under sedation requires careful airway management. Coding bronchoscopy-associated anesthesia correctly depends on understanding what the bronchoscope is doing and where it’s going.
Extremity Anatomy Is About Nerve Access, Not Muscle Names
The upper and lower extremity sections cover a lot of ground — shoulder and axilla, upper arm and elbow, forearm, wrist, and hand on one side; upper leg, knee and popliteal area, and lower leg on the other. The temptation is to study these as anatomy review — which muscles attach where, what the joint capsule looks like. Resist it. In anesthesia, extremity anatomy is almost entirely about nerve access.
The brachial plexus is the dominant structure for upper extremity anesthesia. Interscalene, supraclavicular, infraclavicular, and axillary approaches all target different portions of the same plexus — and each approach is anatomically determined by how the plexus fans out from the cervical roots toward the terminal branches in the hand. Knowing that the axillary approach misses the musculocutaneous nerve explains why it’s not ideal for procedures involving the lateral forearm. That’s the kind of anatomical reasoning that makes procedure notes readable.
For the lower extremity, the femoral nerve, the sciatic nerve, and the popliteal space are the landmarks that carry the most coding weight. The popliteal fossa — that diamond-shaped space behind the knee — is the access point for sciatic nerve blocks used in foot and ankle surgeries. Knowing what sits in that space (popliteal vessels, tibial nerve, common peroneal nerve) makes it possible to follow an anesthesiologist’s approach note without guessing.
Perineum and Pelvis: The Anatomy That Trips Up Coders Most
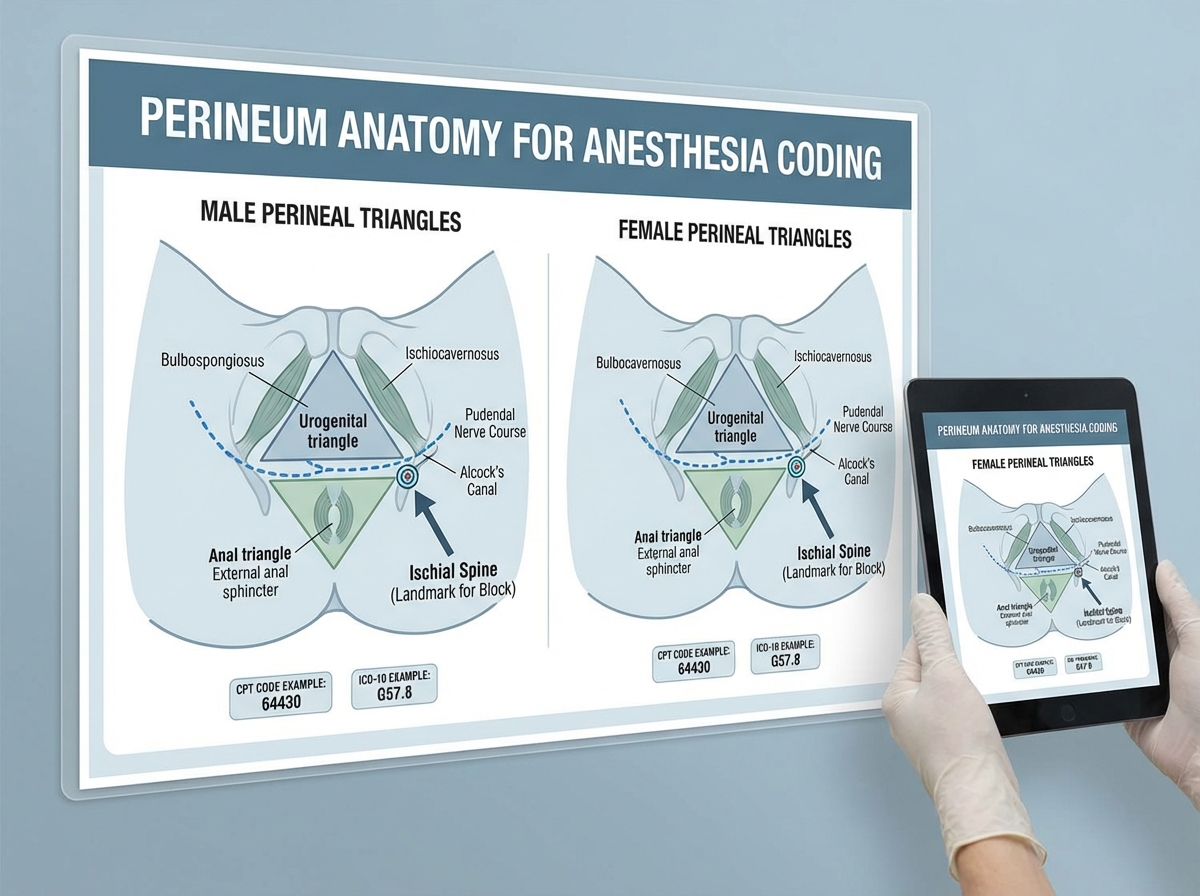
Perineum anatomy gets less attention in most anatomy curricula, and that relative invisibility is exactly why it becomes a gap in anesthesia coding. Perineal procedures — hemorrhoid excisions, vulvar biopsies, urological procedures — require anesthesia, and the approach depends entirely on understanding the perineal anatomy: the urogenital triangle, the anal triangle, the pudendal nerve, and the difference between male and female perineal anatomy.
The pudendal nerve block is a direct application of perineal anatomy. The nerve courses through Alcock’s canal, derived from S2-S4, and is the primary sensory nerve of the perineum. A coder who knows where it runs and how it’s accessed doesn’t have to guess whether a procedure note is describing a nerve block or a local infiltration — the anatomical description makes it clear.
Obstetric anatomy adds another critical layer for anyone coding labor and delivery procedures. The pelvic inlet and outlet, the ischial spines (landmarks for pudendal block placement), the relationship between the sacrum and the uterus, and the anatomical basis for epidural versus spinal choice in labor — all of this ties together when you’re coding a delivery with epidural analgesia and trying to distinguish it from a spinal for cesarean section.
Radiological and Special Procedures: Where Anatomy Meets Sedation
Not every anesthesia case happens in an operating room. Radiological procedures — CT-guided biopsies, fluoroscopic injections, interventional radiology — often require monitored anesthesia care (MAC) or moderate sedation. The anatomy here isn’t about surgical access; it’s about understanding what structure is being targeted so the anesthesia support and monitoring can be coded correctly.
Burn excisions and debridement are a different challenge entirely. Skin structure anatomy — the epidermis, dermis, and subcutaneous layers — becomes relevant when you’re coding for depth of debridement and the anesthesia required for different wound depths. A superficial wound excision under local anesthesia and a full-thickness burn debridement under general anesthesia are different codes for obvious clinical reasons, but you need to understand the skin anatomy to read the operative report and confirm which is which.
These special procedure sections are where anatomy knowledge stops being academic and becomes immediately practical. You’re not studying anatomy to pass a test at this point — you’re studying it so that when a procedure note says “full-thickness excision to the fascia,” you know exactly what layer that is and why the anesthesia choice reflects that depth.
What Changes When the Anatomy Finally Clicks
There’s a specific moment that happens — usually somewhere around the time you’re studying the spine and lower extremity sections together — where anesthesia coding stops feeling like code lookup and starts feeling like clinical reasoning. An operative note becomes a story you can follow. The anesthesiologist’s approach makes sense. The regional technique connects to the anatomy, the anatomy connects to the procedure, and the code becomes the only logical conclusion.
At that point, the CPC AAPC anesthesia questions stop being the hardest questions on the exam. They become the ones you’re most confident about — because you’re not guessing from a code table, you’re reading a procedure description with genuine comprehension. Insurance professionals reviewing anesthesia claims develop the same kind of eye: they can spot a mismatch between the stated procedure site and the anesthesia approach because they understand what anatomically connects them.
The journey from “I’ll just memorize the codes” to “I understand why this code is correct” runs entirely through anatomy. There’s no shortcut through it, but there’s also no mystery to it — it’s a body, mapped systematically, with each region having its own set of structures that make anesthesia delivery possible.
Start with the spine before anything else. The spinal and epidural anatomy underpins the highest-frequency anesthesia coding scenarios and gives you a structural framework that makes everything else easier to place.
Draw the epidural versus subarachnoid space from memory until you can do it without looking. The inability to visualize this distinction is the root cause of most spinal/epidural coding errors.
When studying each body region, immediately find one procedure that uses regional anesthesia in that area. Anatomy without a procedural anchor fades within days.
Learn the brachial plexus as a branching map, not a list. Trace each approach — interscalene, supraclavicular, axillary — and mark which terminal branches it misses. This directly translates to reading approach notes.
Study male and female perineum anatomy side by side. The coding distinctions between pudendal blocks, perineal infiltrations, and caudal blocks depend on understanding the anatomical differences between the two.
Read at least five real operative notes for anesthesia cases before your CPC exam. Anatomy studied in isolation doesn’t prepare you for the language of operative documentation — only actual procedure notes do that.
For every anesthesia type, memorize the anatomical contraindication, not just the technique. Knowing why you can’t do a spinal at L1-L2 (cord still present) is more durable than knowing the preferred level.
After studying thorax anatomy, trace the airway from nostril to carina in sequence. This single exercise connects head anatomy, neck anatomy, and thorax anatomy into one continuous system — and makes airway-related coding immediately more intuitive.
Leave a Reply