There’s a specific kind of frustration that hits when you’ve read three database tutorials, watched a dozen YouTube videos, and still can’t wire up a working form that actually saves data. You know the syntax. You just can’t make the pieces talk to each other.
If you’re looking to learn how to build a point of sale system in Visual Basic .NET, the honest answer is that you need to stop learning components in isolation and start building something real. A POS system is the perfect forcing function — it requires a database, a UI, SQL queries, and business logic all working together. When you build one from scratch, every concept earns its place because you feel exactly what breaks without it.
- VB.NET beginners who’ve hit the wall between syntax knowledge and real application development will find a POS build gives every concept a purpose
- Microsoft Access is a practical, zero-server database choice for desktop POS systems — and learning it here transfers directly to SQL Server logic later
- The jump from theory to working software happens fastest when your project has a real business function: products, stock, transactions, totals
What a Point of Sale System in VB.NET Actually Is
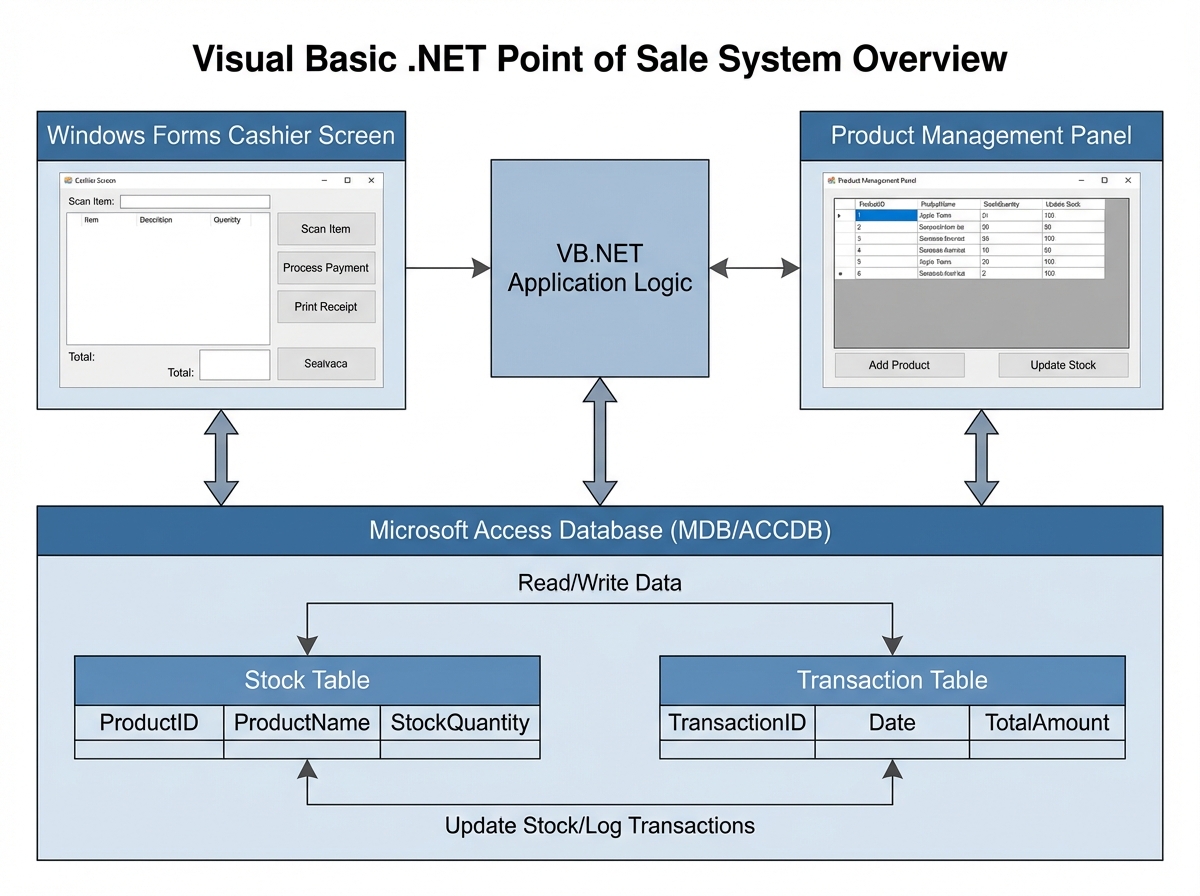
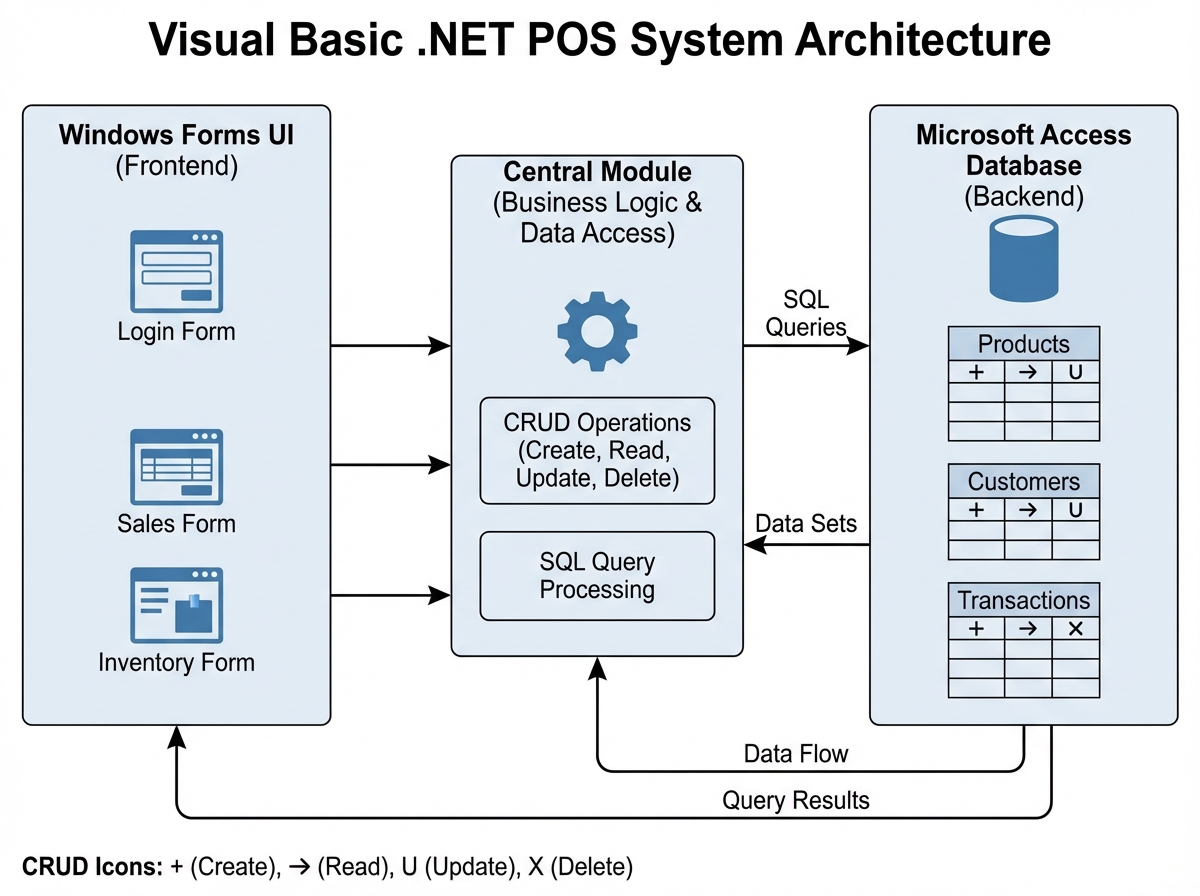
A point of sale system is software that handles the moment a transaction happens — scanning or selecting a product, calculating a total, recording the sale, and updating inventory. In VB.NET, that means a Windows Forms application with a UI your cashier actually touches, a Microsoft Access database storing products and transactions, and SQL statements running behind every button click.
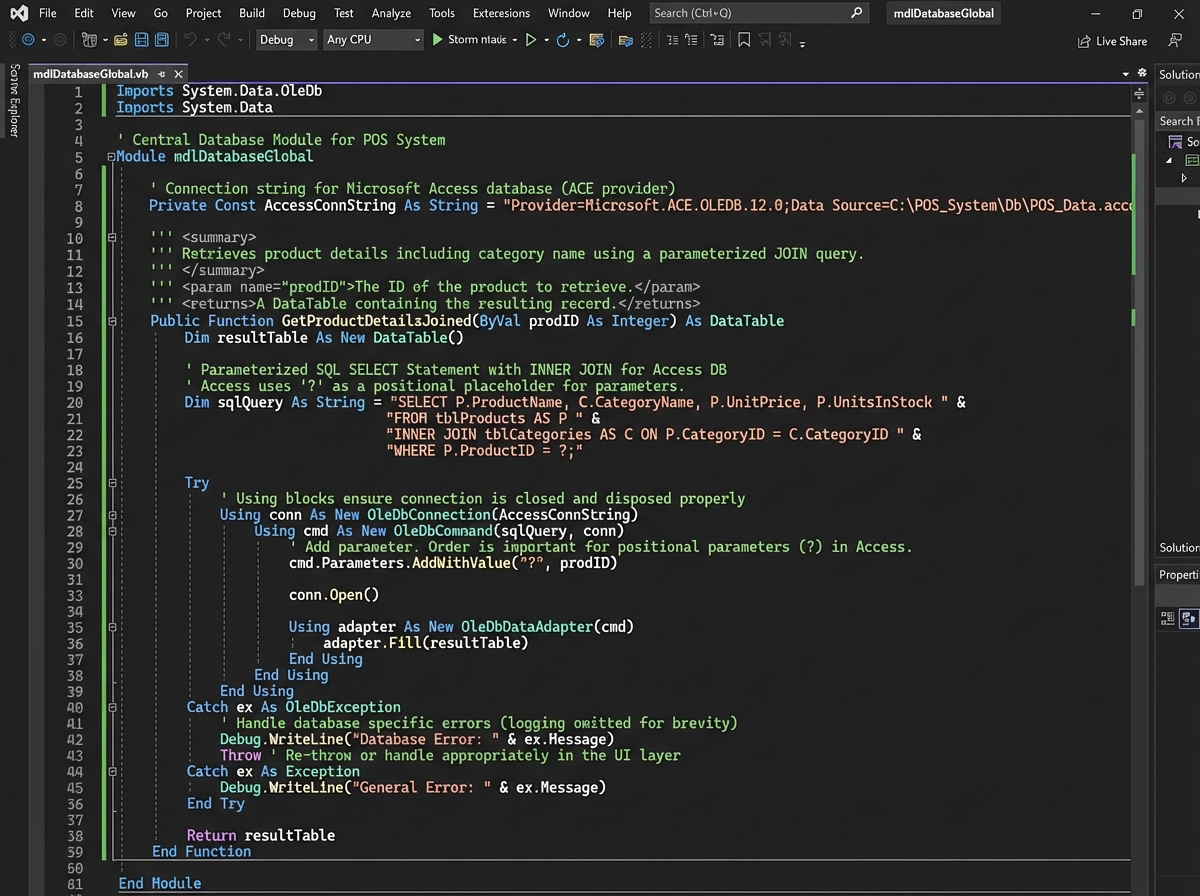
The core of a VB.NET POS has three layers: the form (what the user sees), the module (where your database connection and reusable functions live), and the database (where everything persists). Most beginners try to write database code directly inside button-click events. That’s the first mistake — and it’s the one that makes everything unmaintainable later.
| Layer | Tool | Role |
|---|---|---|
| UI | Windows Forms (VB.NET) | Forms, controls, data binding |
| Logic | Central Module (VB.NET) | DB connection, shared functions |
| Data | Microsoft Access 2016–2019 | Tables, relationships, queries |
Three things that catch every beginner off guard:
- Data binding in VB.NET has two completely different modes — and confusing them breaks your grid silently
- A central connection module isn’t optional; it’s what keeps your app from opening 40 connections at once
- Microsoft Access enforces referential integrity — and your POS will crash on delete until you understand that
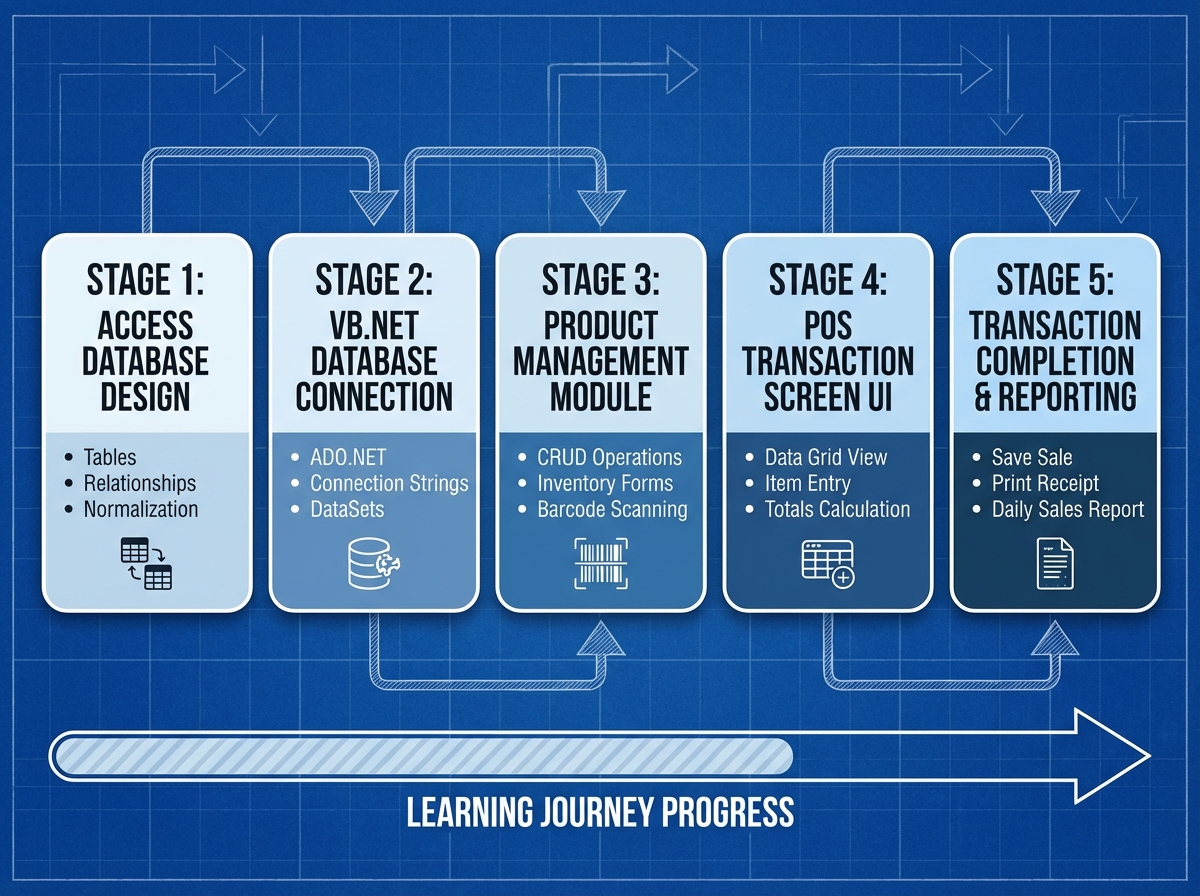
How Long It Actually Takes to Build This
| Stage | Content | Time |
|---|---|---|
| Database design | Tables, relationships, primary/foreign keys in Access | 3–5 hours |
| Central module setup | Connection string, shared functions, error handling | 2–3 hours |
| Product Management System | CRUD forms, search, data binding | 6–10 hours |
| POS transaction screen | Cart logic, stock deduction, totals | 8–12 hours |
| Testing and debugging | Edge cases, referential integrity, UI polish | 3–5 hours |
| Total | 22–35 hours |
The order matters more than the hours — skipping database design and jumping to the UI means you’ll rebuild your tables twice. Going slower through the database and module stages saves you from debugging at the worst possible moment.
The Database Is Not the Boring Part
Most people building their first POS want to skip straight to the form. The UI feels like real progress. The database feels like paperwork. That instinct costs you days later.
When you sit down with Microsoft Access and start thinking through your tables, something forces you to make decisions you weren’t expecting. How do you link a sale to multiple products? Where does stock quantity live — on the product record, or does it get calculated from transaction history? What happens when you delete a product that already appears on an old invoice? These aren’t abstract questions. They’re the exact errors you’ll hit at runtime if you don’t answer them now.
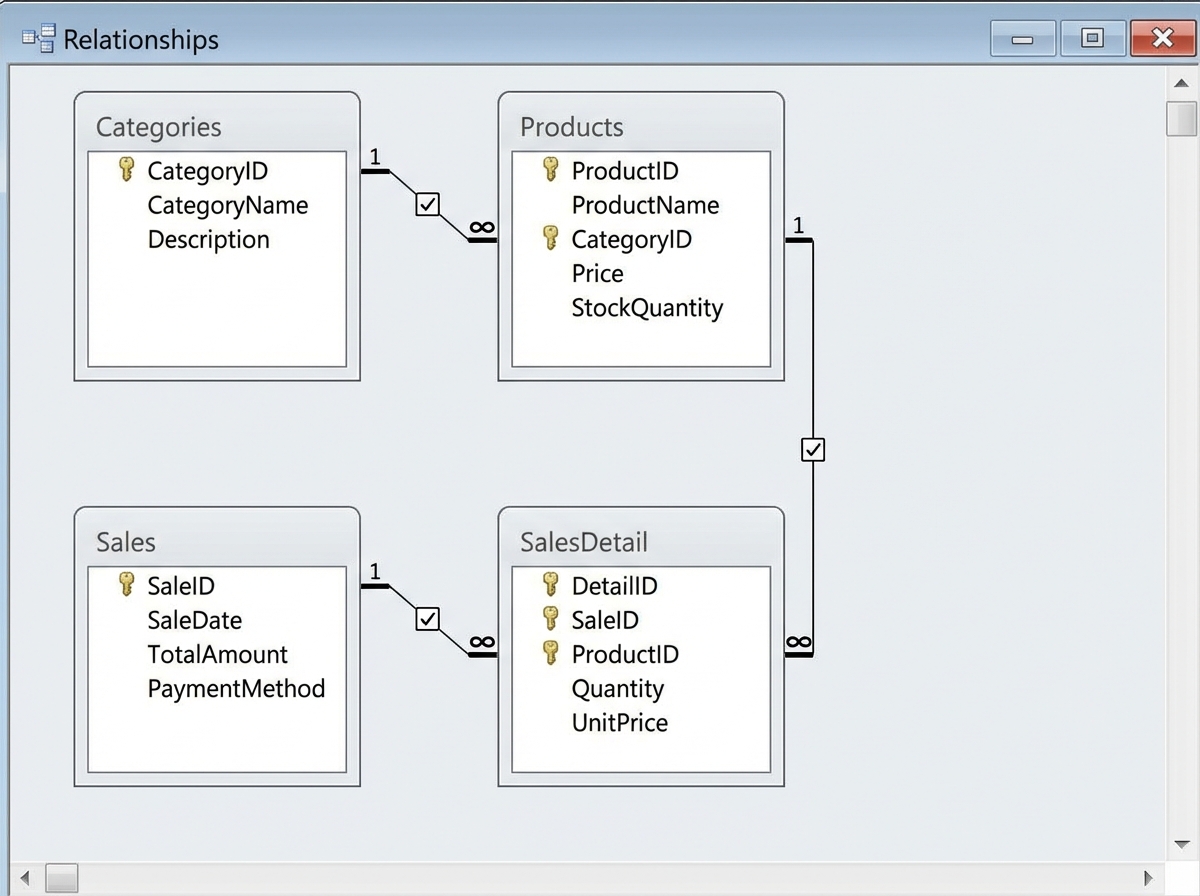
The relationship between your Products table and your Sales Details table is the core of the whole system. Get the foreign keys right, set up referential integrity, and the database will enforce your business rules for you. Get it wrong and you’ll spend hours chasing data that appears to save but doesn’t show up on the right form.
Building the four-part database structure — products, categories, sales headers, and sales line items — feels like slow work. It isn’t. It’s the fastest path to a POS that doesn’t fall apart when real data hits it.
Why a Central Module Changes Everything
Here’s the mistake almost everyone makes when learning VB.NET with a database: they write the connection string inside the button click event. It works the first time. Then they copy-paste it to the next button. Then they have eleven forms and forty connection strings and one typo that breaks everything.
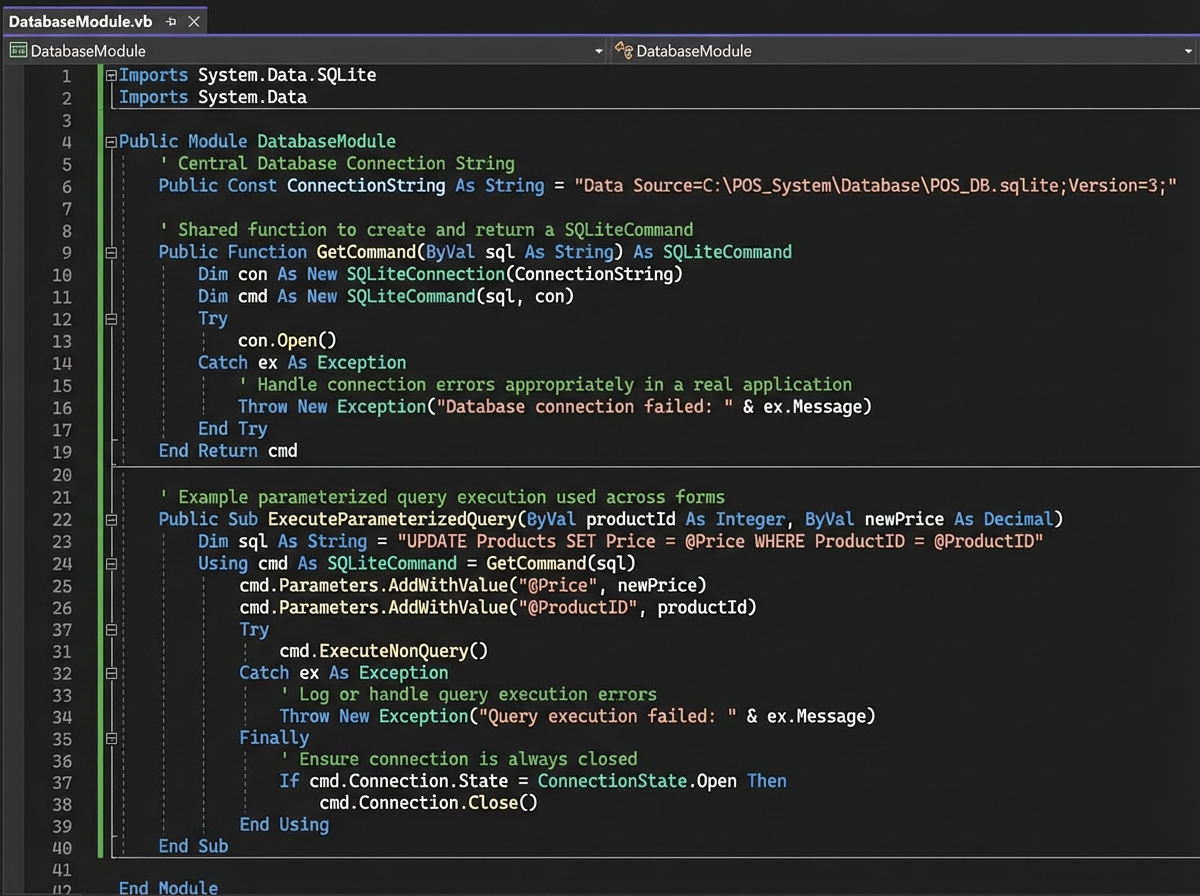
A central module is a single VB.NET file that holds your database connection, your shared SQL execution functions, and anything else every form needs. Every form imports it. Nothing duplicates it. When your Access file moves — and it will move — you change the path in one place.
The moment this clicks is specific: you’re on your fifth form, you need to run a SELECT query, and instead of rewriting the connection logic you just call the function you already wrote. That’s when the module stops feeling like overhead and starts feeling like the point. Writing Python OOP taught me the same architectural lesson from a different angle — shared state belongs in one place, not scattered across every class that needs it.
The central module also becomes where you write your parameterized queries. SQL injection is real even in a desktop Access app if you’re concatenating strings into your queries. Parameters kill that problem and make your code readable at the same time.
Simple vs. Complex Data Binding — Where VB.NET Gets Confusing
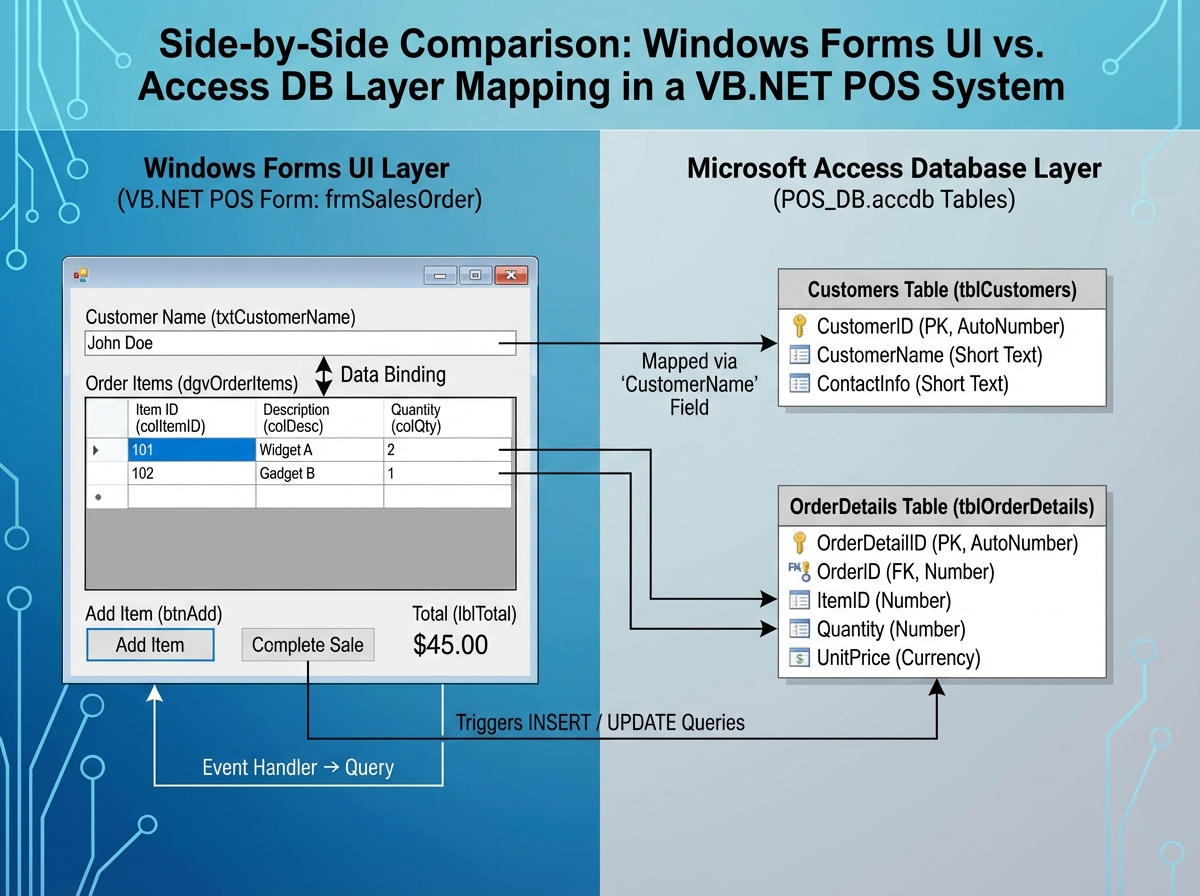
VB.NET has two binding modes and they behave completely differently. Simple data binding connects one control to one field — a TextBox showing the selected product’s name, for example. Complex data binding connects a DataGridView to an entire table or query result. Neither is better. They solve different problems, and mixing them up produces bugs that look completely random.
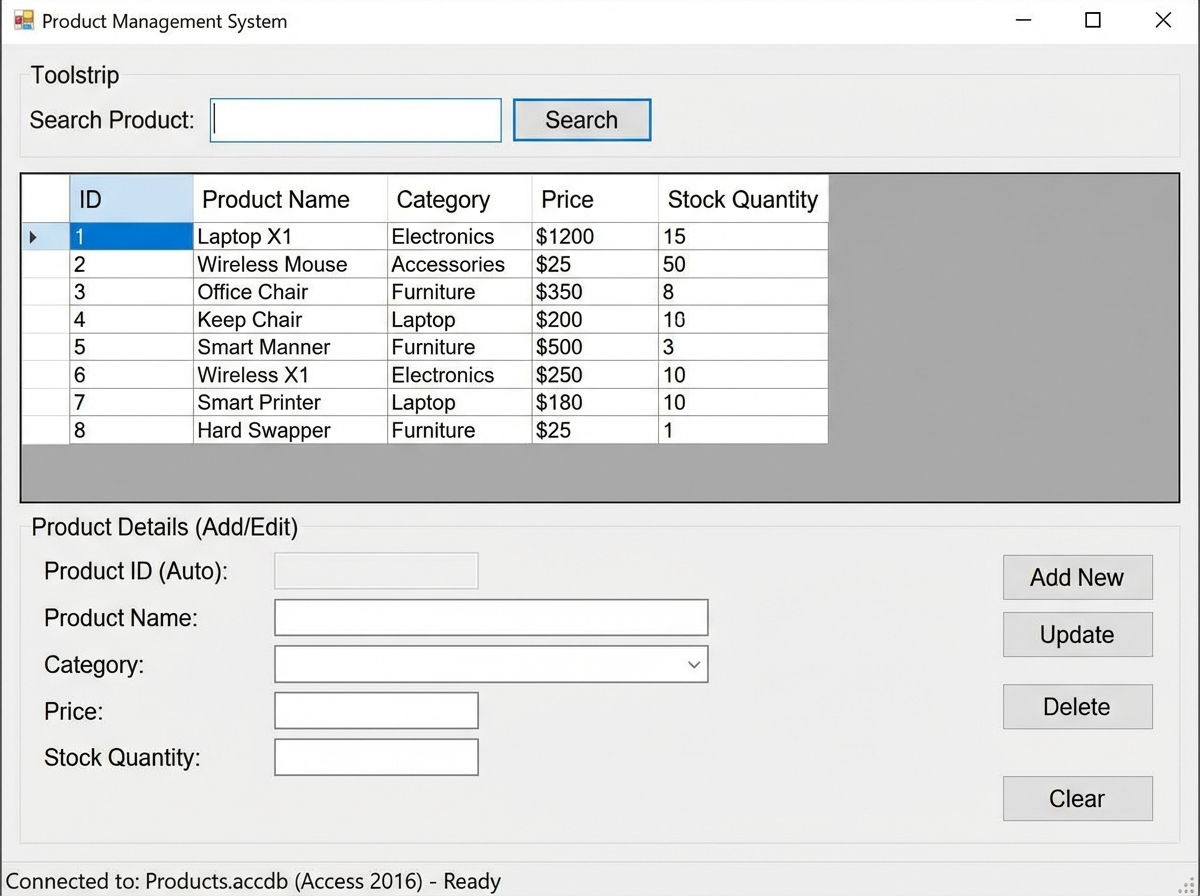
The confusion usually hits during the Product Management form. You’ve got a DataGridView listing all products, and a set of TextBoxes below it that should show the selected row’s details. If you try to complex-bind the TextBoxes to the same DataSource as the grid, they fight each other. The grid updates. The TextBox doesn’t. Or worse, the TextBox updates but writes back to the wrong row.
The fix is architectural: the grid gets complex binding to the full DataTable, and the TextBoxes get populated manually from the grid’s SelectedRows collection on the SelectionChanged event. That one pattern — grid selection triggers manual field population — solves the majority of data binding confusion in any VB.NET database form.
Once you understand that distinction, your CRUD operations become predictable. Add, update, delete all hit the database through your central module, then refresh the grid by re-running the SELECT. Simple, repeatable, debuggable.
Building the Product Management System First
The product management form is where every foundational skill gets tested before you need it under pressure in the POS screen. You’re building search, CRUD, and data binding all at once — but on a forgiving object where the stakes are low. A product name saves wrong? You catch it immediately. That same bug in a transaction would corrupt a sale record.
Search is the feature that reveals whether your SQL architecture is solid. If you have eleven TextBoxes each running their own query with string concatenation, adding a new search field means touching eleven places. If you’ve routed everything through a single parameterized query function in your module, search is one parameter change.
The stock quantity field is where business logic enters the picture for the first time. Stock isn’t just a number — it’s a constraint. Your product form should prevent negative stock entries. Your POS screen, later, should refuse to sell more units than exist. Implementing that check in the product form first means you already know how to wire it when the pressure is higher.
By the time the product management system works end-to-end — add, edit, delete, search, paginate — you’ve written every pattern the POS screen will use. The POS is harder, but it won’t be unfamiliar.
The POS Screen Is Where It All Comes Together
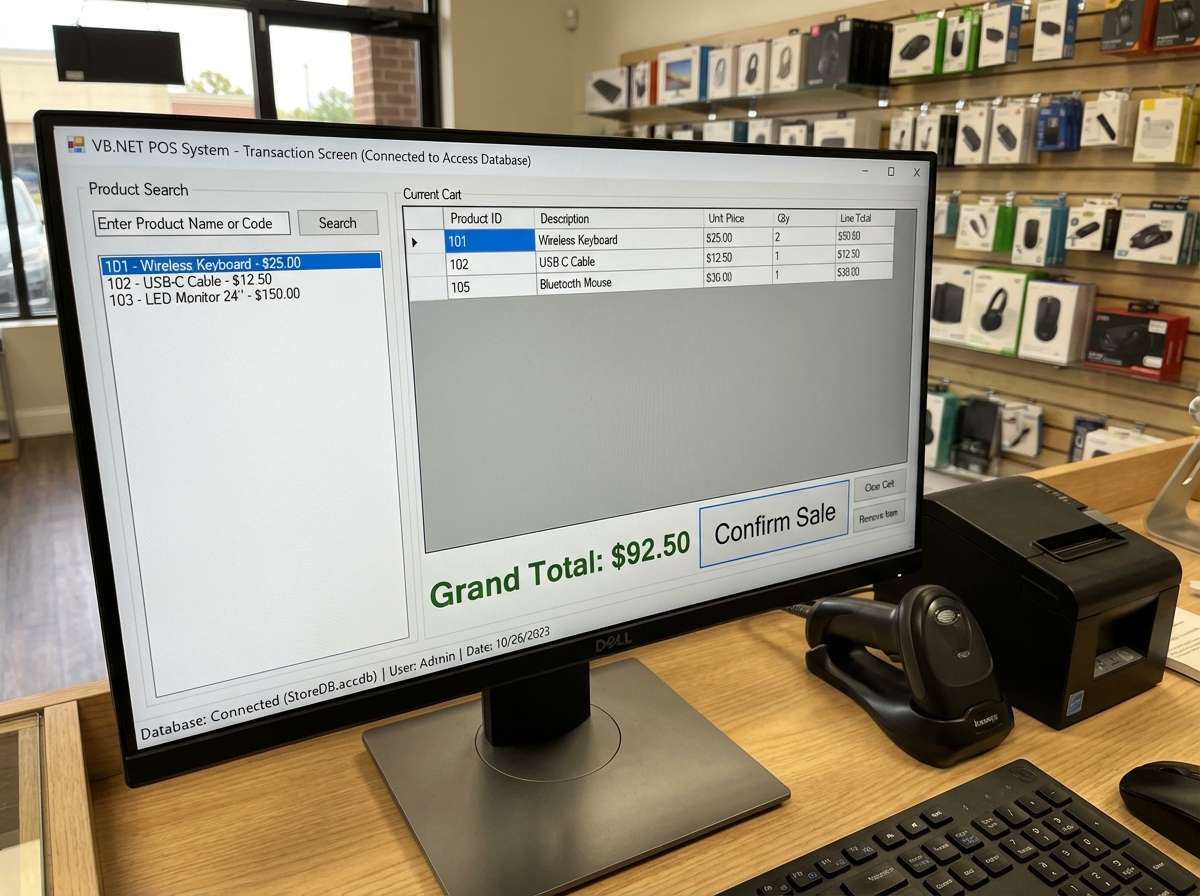
Building the actual point of sale screen feels different from the product form. There’s a cart — a temporary collection of items being purchased. There’s a running total that updates with every add. There’s a confirm sale action that writes to two tables simultaneously and deducts stock. Every click has a consequence.
The cart is not a database table. That’s the first conceptual shift. It’s an in-memory DataTable that lives only for the duration of one transaction. You populate it by selecting products, you calculate totals from it, and you only write to the database when the sale is confirmed. If the cashier cancels, you discard it. Nothing in Access is touched until the transaction commits.
Committing the sale means writing a header record to your Sales table — date, total, cashier — getting the auto-generated SaleID back, then writing one line-item record per cart row to your SalesDetail table, each referencing that SaleID. Then reducing the stock quantity on each product. That sequence has to be atomic — if the stock update fails, the sale record shouldn’t exist. In Access without transaction support at the form level, you handle this with careful ordering and rollback logic in your module.
When it works — when you scan a product, see it appear in the cart, watch the total update, hit Confirm, and then open the product list to see the stock number drop by exactly one — that’s the moment the whole system stops being an exercise and starts being software.
Writing SQL That Scales Beyond One Table
The SQL you write for a POS system is different from tutorial SQL. You’re not just selecting from one table — you’re joining Products to Categories to display a name instead of an ID, joining Sales to SalesDetail to reconstruct a transaction, filtering by date range for a daily report.
Every SQL statement in a working POS system has a real business reason. The product search query needs to match on partial name, on barcode, on category. The transaction history query needs to filter by date, sort by time, and show a product name — not a product ID. Writing those queries forces you to understand JOIN syntax not as a concept but as something you need to see the data you care about.
Parameterized queries through your central module mean you write the SQL once, pass variables in, and call it from anywhere. That discipline also teaches you to think of SQL as a vocabulary — you build a small library of queries for your specific app, and you stop reinventing them for every button click.
Looking Back at What Actually Mattered
The architecture decisions made in the first two hours — database relationships, central module, parameterized queries — determined whether the last twenty hours went smoothly or turned into debugging sessions. The UI is visible. The database is invisible. Beginners optimize for what they can see, and that’s exactly backwards.
Building a complete VB.NET POS system makes you realize that most programming confusion isn’t about syntax. It’s about not having a real problem to solve. Syntax sticks when it does something you actually needed done.
Specific actions you can take right now:
- Design your database tables on paper before opening Access — draw the relationships, name the foreign keys, and decide where referential integrity applies before writing a single line of VB.NET
- Create your central module before your first form — paste your connection string there, write one ExecuteNonQuery and one ExecuteReader function, and never write database code outside it
- Use parameterized queries from the first SQL statement you write — the habit costs nothing to build early and saves you from a class of bugs that are nearly impossible to debug late
- Build CRUD on the product form before touching the POS screen — every pattern you’ll need under pressure exists here first, in a lower-stakes environment
- Keep your cart as an in-memory DataTable, not a database table — transactions that haven’t been confirmed shouldn’t exist in your database, ever
- Test your stock deduction logic with a product that has exactly one unit — edge cases at zero reveal whether your constraint logic actually works before a real cashier hits it
- Write your sale commit sequence in the correct order — header first, get the returned ID, then line items, then stock update — and add error handling between each step
- Refresh your DataGridView by re-running the SELECT after every write — don’t try to update the grid in memory; just re-query and rebind, it’s simpler and more reliable
Leave a Reply