You boost a post. Twenty-four hours later you check the results: 847 people reached, three likes, zero leads. You do it again the next week because you don’t know what else to do.
If you’re looking to learn Facebook marketing and paid ads from scratch, the honest answer is that most people start by confusing activity with strategy — and Meta’s platform is specifically designed to let you spend money before you understand what you’re buying. This article breaks down the full journey: from setting up a business presence that actually works, to understanding the Ads Manager hierarchy, to running campaigns that drive measurable results. Everything here applies whether you’re promoting a local service, an e-commerce store, or a client’s brand as a freelancer.
- You don’t need a marketing degree — but you do need to stop treating Facebook like a notice board and start treating it like a paid distribution channel with real targeting logic.
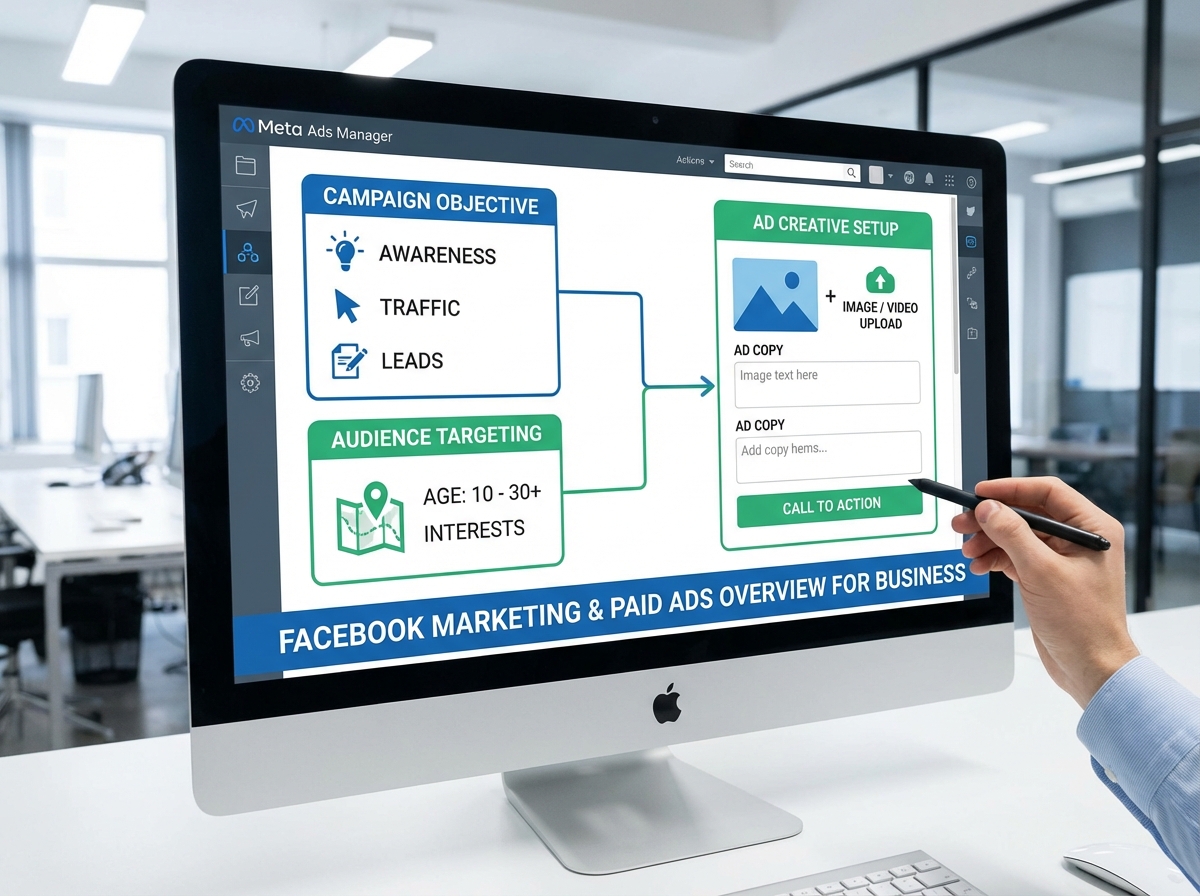
- The Meta Ads Manager is intimidating at first, but once you understand that every campaign is just three nested decisions — objective, audience, creative — the interface clicks into place.
- A $50 test budget spent strategically will teach you more than six months of organic posting ever could.
What Facebook Marketing Actually Means for a Business
Organic Facebook posting and paid Facebook marketing are not the same skill. Organic is about consistency and content quality — you post, the algorithm decides who sees it, and reach has been shrinking for years. Paid marketing is about buying precise distribution: you define who sees your message, when, and what action you want them to take. The moment that distinction lands, everything else makes sense.
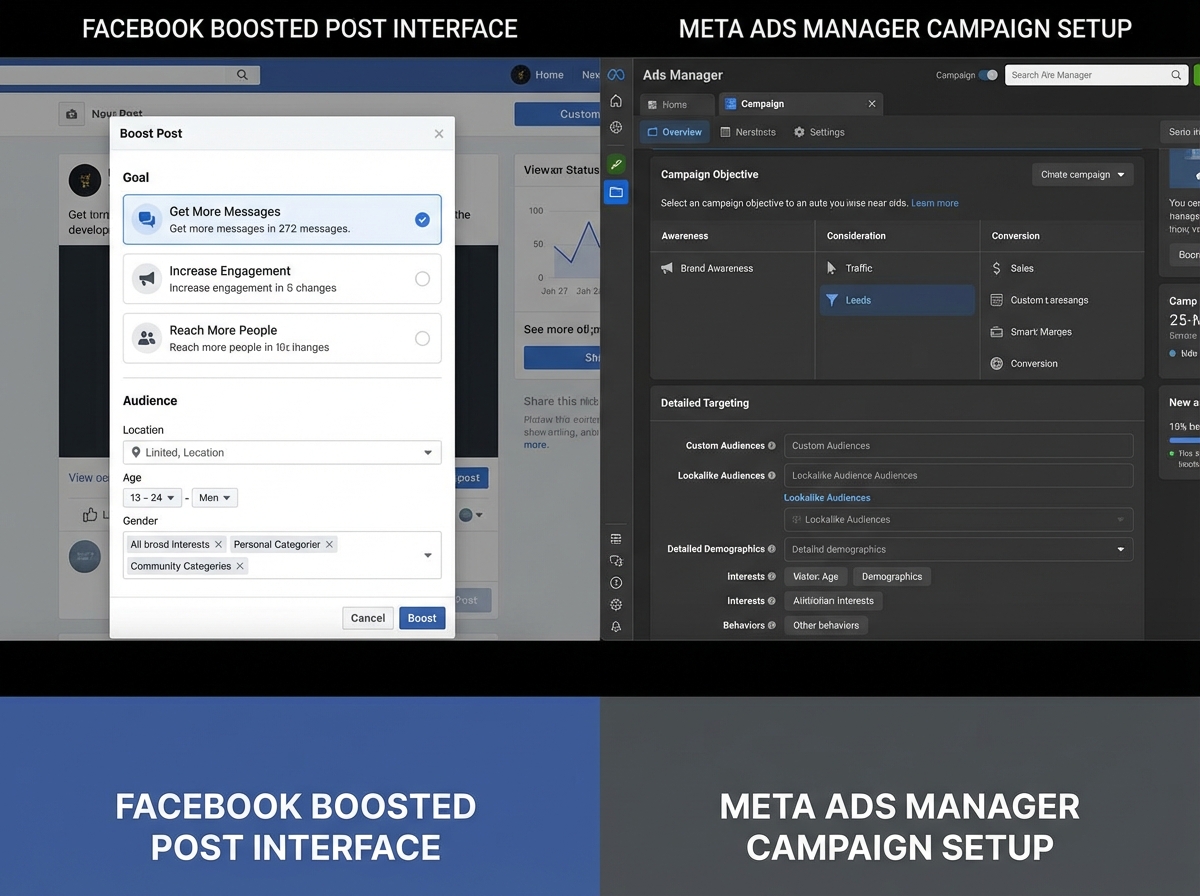
For a small business owner or freelancer new to this, the terminology can blur quickly. “Boosting” a post feels like advertising, but it bypasses the full targeting and optimization controls available inside the actual Ads Manager. It’s the difference between handing a flyer to whoever walks past your door versus mailing it directly to 10,000 people who match your exact customer profile.
| Term | What It Actually Means | Why It Matters |
|---|---|---|
| Boosted Post | One-click promotion using simplified targeting | Fast but limited — no conversion tracking, minimal control |
| Meta Ads Manager Campaign | Full campaign built inside Ads Manager with objective, audience, creative | Full control over budget, bidding, placement, and optimization |
| Meta Business Suite | Dashboard for managing Pages, inboxes, and basic insights | Starting point before graduating to Ads Manager |
| Meta Pixel | Code snippet on your website that tracks visitor behavior | Essential for retargeting and conversion optimization |
Keep this table as a reference point — the confusion between these four things is where most beginners lose weeks.
Three things that separate real Facebook marketing from casual posting:
- Organic reach on Facebook Pages is below 5% for most accounts — paid distribution is not optional if reach matters
- The Meta Pixel transforms your website visitors into a retargetable audience — without it, you’re advertising blind
- Campaign objective selection changes how Meta’s algorithm optimizes your budget — choosing the wrong one is the most expensive beginner mistake
Estimated Time to Go From Zero to Running Real Campaigns
| Stage | Content | Time |
|---|---|---|
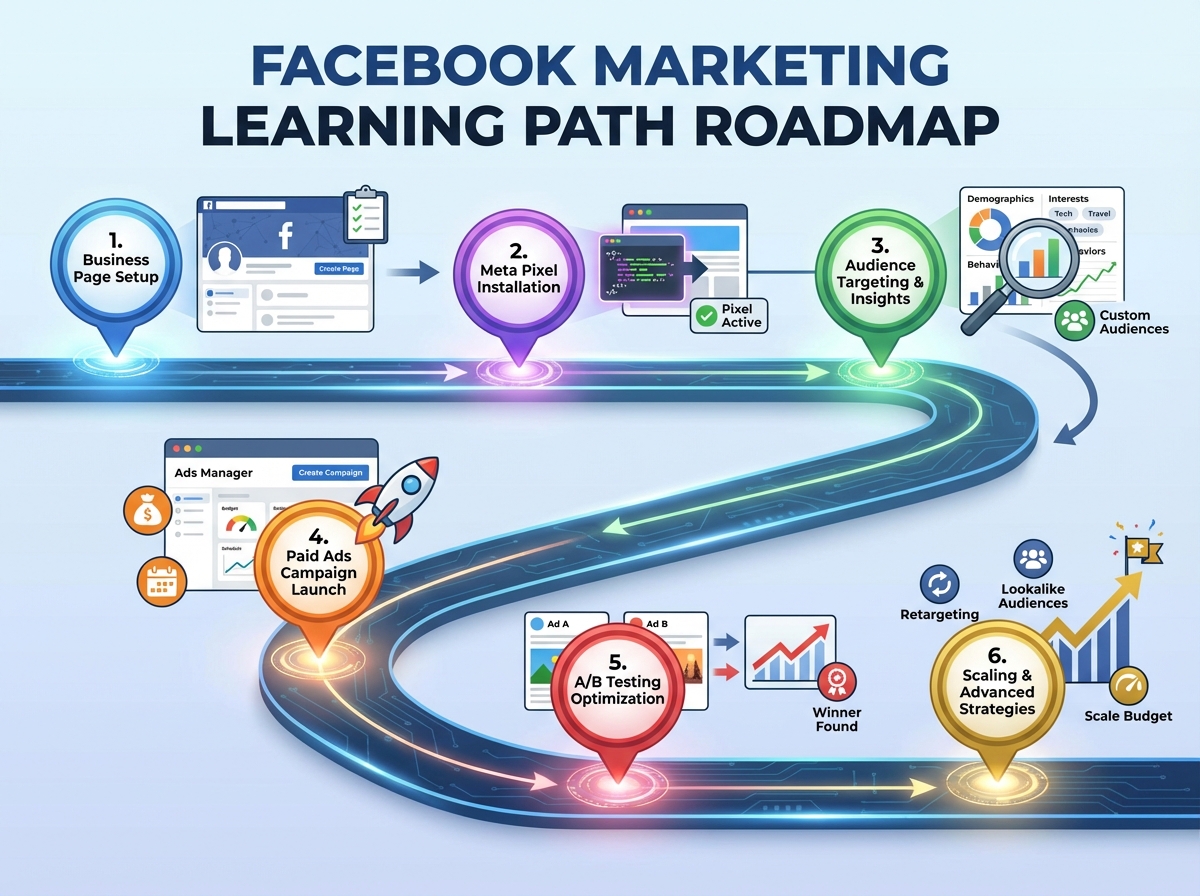
| Foundation | Facebook Business Page setup, branding, connecting Instagram | 2–4 hours |
| Content Strategy | Content calendar, AI-assisted content creation, Reels basics | 4–6 hours |
| Ads Setup | Business Manager, Ad Account, Meta Pixel installation | 2–3 hours |
| Audience Research | Buyer persona creation, interest targeting, Facebook Insights | 3–5 hours |
| Campaign Execution | Running Traffic, Engagement, Lead, and Sales campaigns | 4–8 hours |
| Testing & Optimization | A/B testing creatives and audiences, reading metrics | Ongoing |
| Total | Full beginner-to-launch cycle | 15–26 hours |
The order here matters more than the speed — someone who rushes to run ads before installing the Pixel will spend money without data to learn from. If this takes you twice as long as the estimate, that’s not a failure — it usually means you’re testing properly instead of just checking boxes.
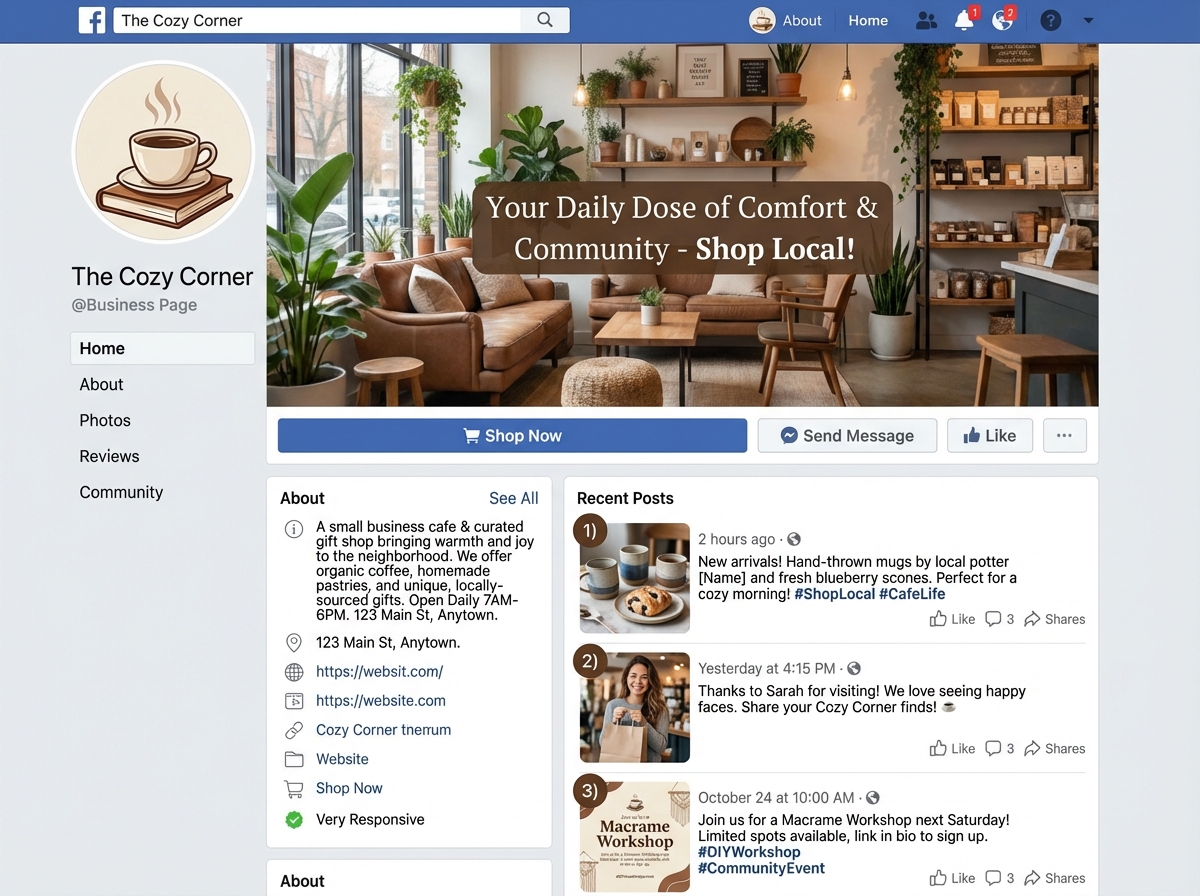
Building a Facebook Business Page That Doesn’t Lose You Before the Ad
Most people treat the Business Page setup as a formality — fill in the name, upload a logo, move on. That’s a mistake. Before anyone clicks an ad, they land on your Page. If it looks abandoned, incomplete, or inconsistent with the ad they just saw, they leave. The Page is not separate from your advertising — it’s part of the conversion path.
The fundamentals here are: a clear profile photo (logo or headshot, not a blurry phone photo), a cover image that communicates what you do in under three seconds, a complete “About” section with a call to action, and at least a handful of posts so the Page doesn’t look empty. Connecting a Facebook Business Page to an Instagram Professional Account also matters — Meta treats them as one ecosystem, and your ads can run across both platforms from a single campaign.
One practical move that gets overlooked: use the Page’s organic invitation feature early. When you post content and it gets engagement, you can invite people who reacted to follow the Page. It’s a small lever, but it builds a seed audience that makes your first ad campaigns cheaper — Meta’s algorithm uses Page engagement as a quality signal.
Content Creation Before You Spend a Dollar on Ads
There’s a temptation to skip straight to paid campaigns. The logic feels sound: why invest time in organic content when you can just pay for reach? The problem is that ads need creative assets — images, videos, copy — and if you haven’t practiced making content, your first ad creative is going to be weak. The skills overlap.
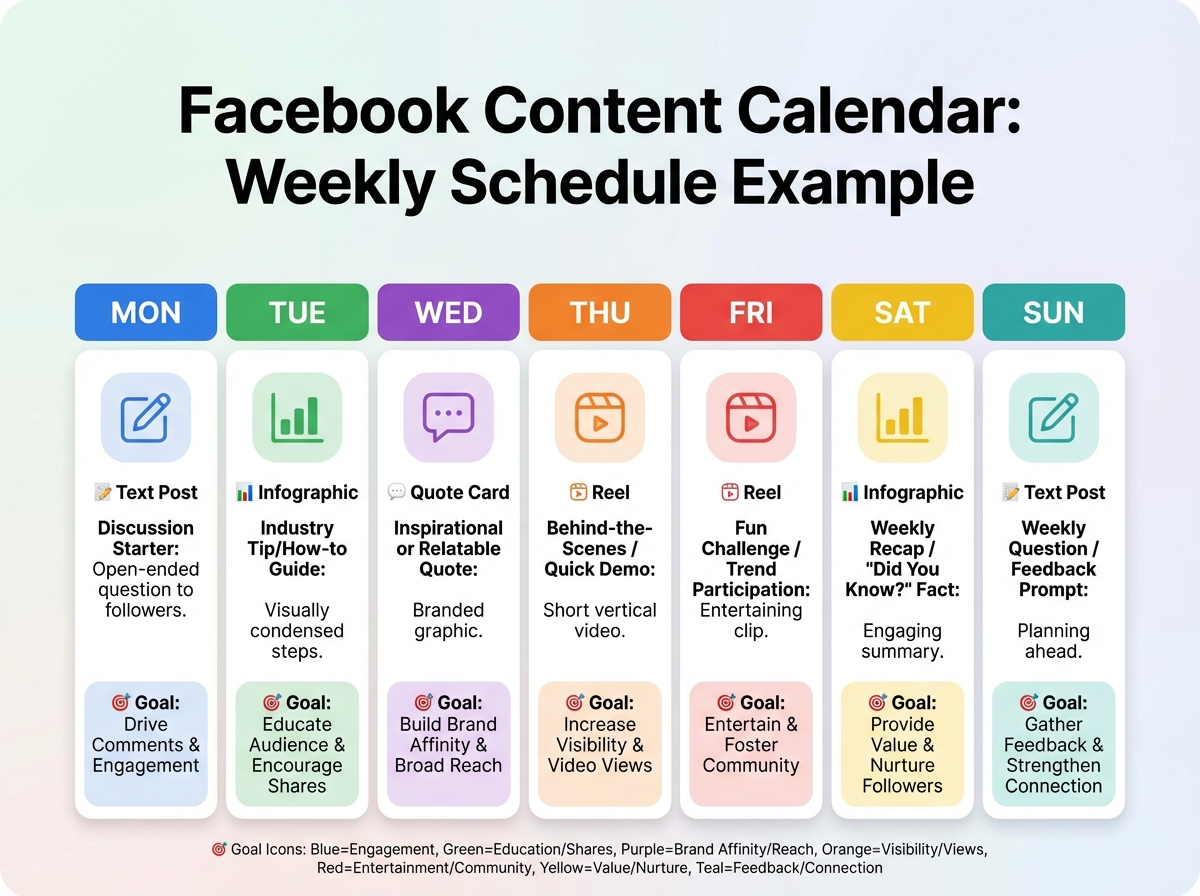
A content calendar is not a corporate tool reserved for agencies. For a solo business owner or freelancer, it’s just a simple weekly plan: what type of content goes out, on which day, with what goal. The goal distinction matters — some posts are meant to educate, some to build trust, some to prompt action. Mixing all three into every post results in none of them working.
Generative AI has genuinely changed what’s possible for single-person operations here. Creating infographics, quote cards, short Reels scripts, and post copy no longer requires a design background or hours of work. The constraint shifts from production to judgment — knowing which content idea is worth making, and which format fits the platform. Facebook Reels, in particular, get disproportionate organic reach right now. Even if your primary goal is paid advertising, publishing Reels regularly gives the algorithm more data about your audience — data that feeds back into better ad targeting.
For anyone building a business from the ground up, the content foundation work connects directly to paid strategy later — audiences built from Page engagement become Custom Audiences in Ads Manager.
Understanding Meta Ads Manager Before You Touch the Budget
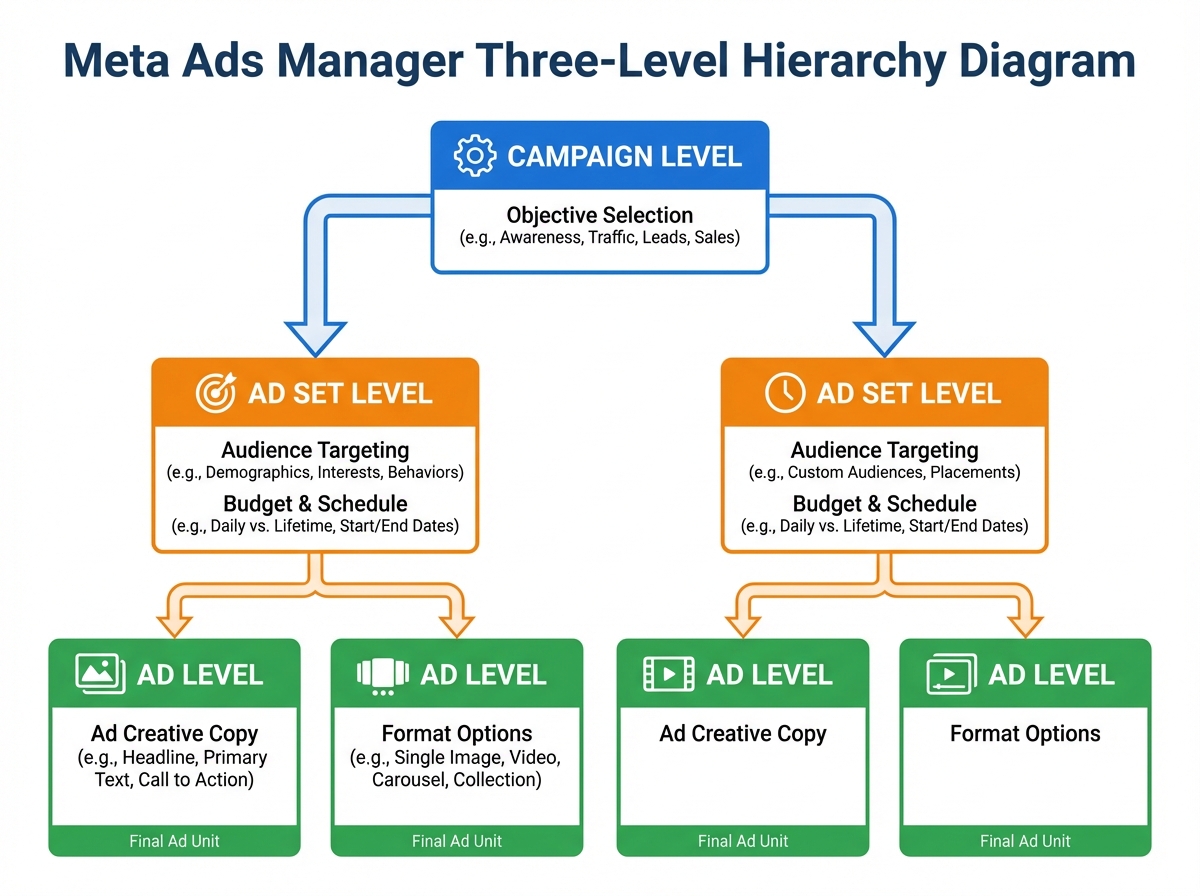
The single biggest mistake people make when learning Facebook paid ads is opening Ads Manager, seeing the interface, panicking at the options, and clicking “Boost Post” instead. Ads Manager looks complex because it has a lot of options — but its logic is actually simple once you see the three-level hierarchy.
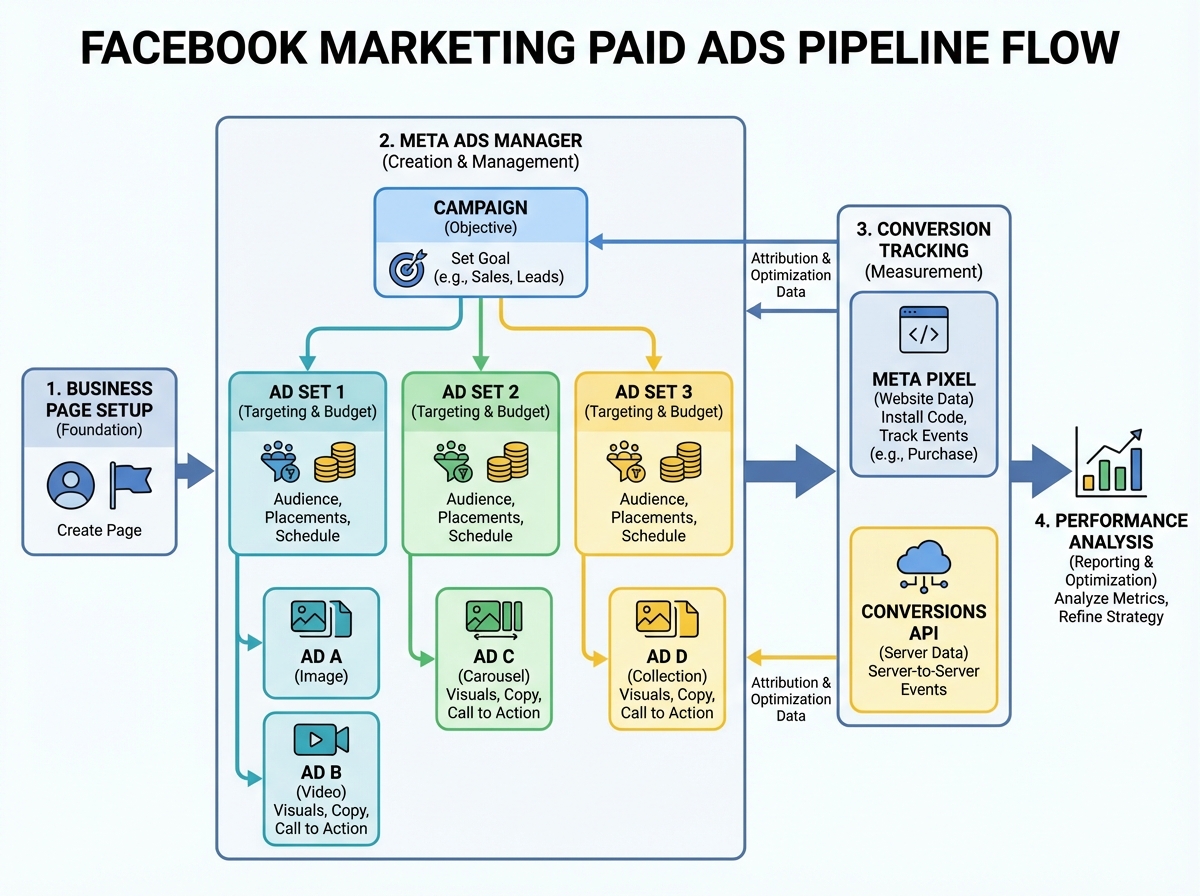
Every campaign in Meta Ads Manager is structured the same way: Campaign → Ad Set → Ad. The Campaign level is where you pick your objective — what you want Meta to optimize for. The Ad Set level is where you define your audience, budget, schedule, and placements. The Ad level is where you upload the creative and write the copy. That’s it. Everything else in the interface is a variation or refinement of those three decisions.
Choosing the wrong campaign objective is more expensive than most beginners realize. If you select a Traffic objective but your actual goal is Sales, Meta will send you clicks — but it won’t optimize for people likely to buy. The algorithm is literal. It does exactly what you tell it to do at the Campaign level. Traffic means clicks. Leads means form submissions. Sales means purchases. Getting this right before spending anything is non-negotiable.
Meta currently offers 11 campaign objectives grouped into three categories that roughly mirror the classic marketing funnel: Awareness, Consideration, and Conversion. You don’t need to master all 11 at once. Start with Traffic to understand how the system works, then move to Leads or Sales once the Pixel is installed and tracking properly.
Building an Audience That Actually Wants What You’re Selling
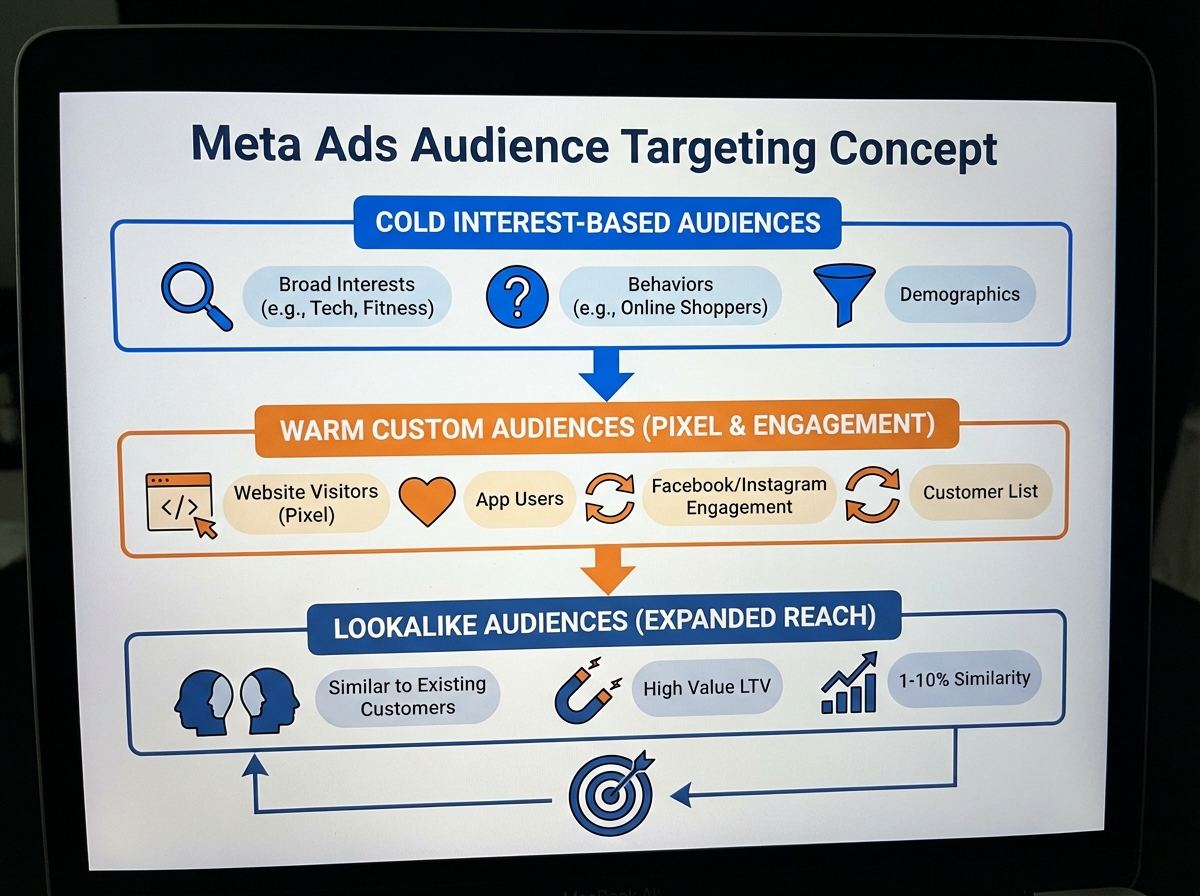
Facebook’s targeting system is the reason the platform became dominant for direct-response advertising. The database of user interests, behaviors, and demographics is enormous — but the skill isn’t using all of it, it’s knowing which slices actually predict purchase intent for your specific offer.
Before touching the targeting interface, the buyer persona work has to happen first. Not in Ads Manager — on paper, or in a document. Who is this person? What do they care about? What problem are they trying to solve? What other brands, publications, or interests tell Meta that someone fits this profile? A well-researched persona with four or five sharp interest categories will outperform a lazily broad audience every time — and cost less per result because relevance scores improve.
Facebook Insights is underused at this stage. If you already have a Business Page with any engagement history, Insights gives you demographic data on who’s already responding to your content — age ranges, locations, times of day. This is free audience research that most beginners skip entirely because they’re rushing to run ads.
Once you have even a small customer list or website traffic, Custom Audiences change the game. Upload an email list, create a website visitor audience using the Pixel, build an engagement audience from people who watched your Reels — these are warm audiences who already have some familiarity with your brand. Lookalike Audiences take one of these warm groups and ask Meta to find millions of people who share similar behavioral patterns. This is how small businesses compete with large advertising budgets: precision over volume.
Writing Ad Copy and Designing Creatives That Stop the Scroll
Most ad copy fails for one reason: it describes the product instead of the problem. People scroll Facebook while half-distracted. The only thing that breaks that pattern is something that mirrors exactly what’s already in their head — a frustration, a desire, a specific situation they recognize.
The AIDA framework (Attention, Interest, Desire, Action) is the most practical structure for Facebook ad copy. Attention is the first line — it has to earn the next sentence. Interest is where you introduce what you’re offering and why it’s relevant. Desire is where you make the outcome feel real and worth wanting. Action is a single, specific call to action — not three options, just one. The mistake beginners make here is treating every line as equally important. The first sentence carries 80% of the weight. If it doesn’t hook, nothing else gets read.
For ad images and videos, the principle is similar: the first visual frame has to earn the next. Static images with strong contrast and minimal text tend to outperform heavily designed graphics in most niches — counter-intuitive but consistent. For video, the first three seconds determine whether someone watches or scrolls. Start with the problem or outcome, not a logo.
For anyone building client campaigns as a freelancer, ad creative quality is often what separates a $5 cost-per-click from a $0.80 one — and that difference directly determines whether a client renews.

What the Meta Pixel Does and Why You Can’t Skip It
The Meta Pixel is a short piece of JavaScript code that you install on your website. Once it’s there, it fires every time someone visits a page, adds something to a cart, or completes a purchase — and it reports all of that back to Meta. This is how Facebook advertising closes the loop between an ad someone clicked and an action they took on your site.
Without the Pixel, you’re running ads with no feedback mechanism. You can see clicks and reach inside Ads Manager, but you can’t tell which campaign drove which sale. You can’t build retargeting audiences from website visitors. You can’t create Lookalike Audiences based on actual buyers. You can’t optimize campaigns for conversions — only for traffic. Everything that makes paid advertising learnable and scalable depends on the Pixel being installed correctly before you spend money.
Installing the Pixel is a one-time setup that takes about twenty minutes. Meta’s Events Manager walks through it step by step. If you’re on Shopify, WordPress, or most major CMS platforms, there’s a native integration that handles most of it automatically. The technical barrier is genuinely low — the cost of not doing it is genuinely high.
The Only Way to Know What’s Actually Working: Split Testing
Even experienced media buyers don’t know in advance which creative, which audience, or which offer will perform best. The difference between someone who scales campaigns and someone who burns through a test budget is whether they run structured tests or just run ads and hope.
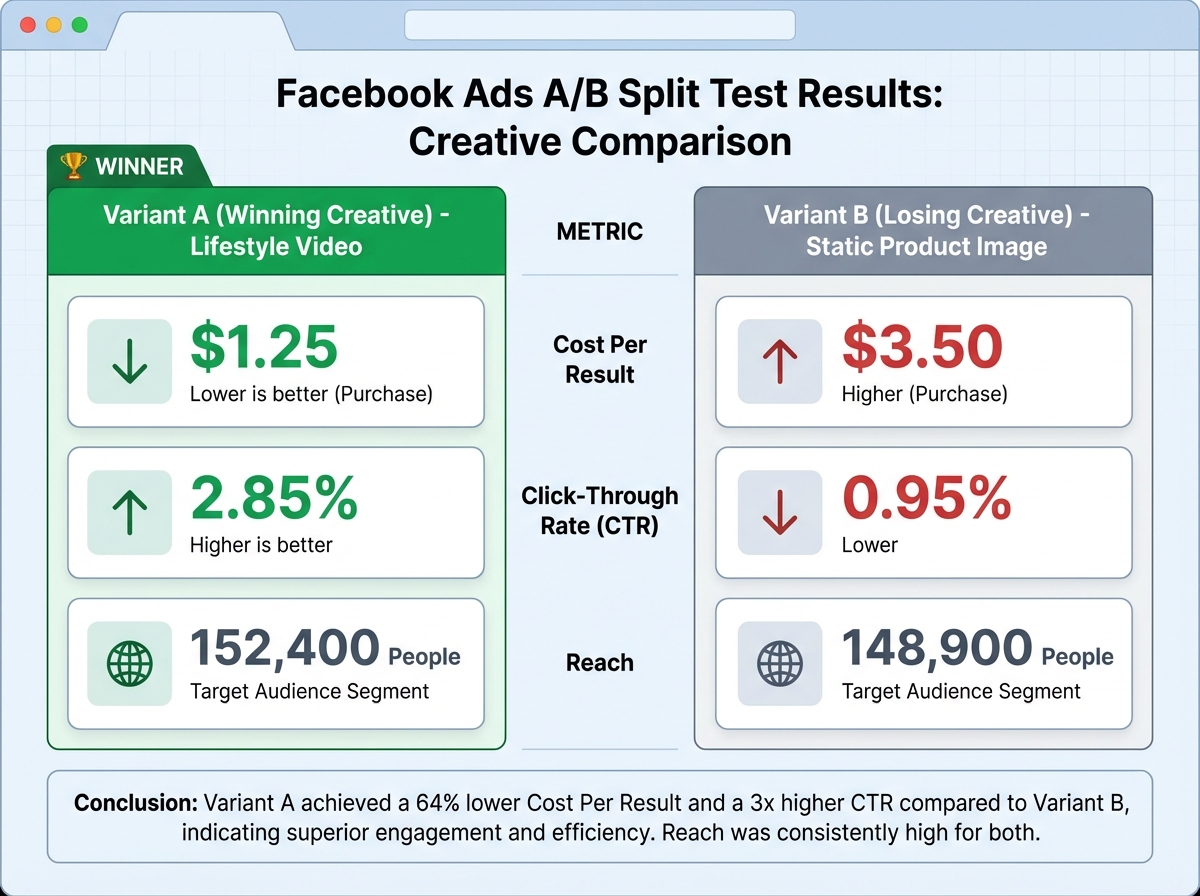
Split testing (A/B testing) in Meta Ads Manager lets you run two versions of a campaign with one variable changed — same audience, different creative; same creative, different audience; same ad, different objective. Meta splits the budget evenly, measures which version gets the lower cost-per-result, and gives you a statistically informed winner. The key constraint: change only one variable per test. Changing two things at once makes it impossible to know what caused the difference.
The practical sequence for a beginner: test audiences first (two different interest groups or a cold audience versus a warm Custom Audience), then test creatives within the winning audience, then test offers or calls to action within the winning creative. This funnel of testing is methodical, not expensive — even a $30–$50 test per split is enough to get directional data on most offers.
For anyone learning this as a marketable skill — for freelancing or an in-house role — understanding how to run profitable video campaigns from scratch on other platforms follows the same split-testing logic. The discipline transfers.
Reading the Numbers Without Getting Lost in Them
Ads Manager surfaces dozens of metrics. Most of them are noise for a beginner. The ones that actually tell you whether a campaign is working are: CTR (Click-Through Rate), CPC (Cost Per Click), CPA (Cost Per Acquisition), and ROAS (Return on Ad Spend).
CTR tells you whether the creative and copy are resonating — a low CTR means people are seeing the ad but not engaging with it. CPC tells you what you’re paying for each click, which reflects both creative quality and audience competition. CPA is the number that tells you whether the math works for your business: if it costs you $12 to acquire a customer and your product margin supports that, you scale. If it costs $85 for a $30 product, you stop and diagnose before spending more. ROAS is the advertiser’s primary profitability metric: revenue generated divided by ad spend. A ROAS of 3x means every dollar spent returned three in revenue.
The discipline here is knowing when to kill an ad versus when to let it run longer. Killing too early wastes the learning phase — Meta’s algorithm needs data to optimize, and that takes time and impressions. Killing too late bleeds budget on a creative that simply isn’t converting. A general rule: give a campaign enough impressions to reach statistical significance before making a decision. For most small budgets, that means running a campaign at least 3–5 days before drawing conclusions.
What Actually Matters When You Look Back
Looking back on the full arc from posting into the void to running optimized campaigns, the progression isn’t really about platform features. It’s about making a mental shift from content creator to media buyer — someone who thinks in terms of cost per result, audience signals, and systematic testing rather than likes and reach.
The platform is a tool. Understanding the logic underneath it — why the Pixel matters, why objective selection changes outcomes, why creative testing is the only honest way to know what works — is what makes you effective on it. That understanding also transfers. The same structured thinking applies to any paid platform you work on next.
Here’s what to actually do with this:
- Set up your Business Page completely before touching Ads Manager — an incomplete Page undercuts every ad you run because it’s where people land when they want to verify you’re legitimate.
- Install the Meta Pixel before spending a single dollar on ads — without it, you’re flying blind and can’t retarget, optimize for conversions, or build Lookalike Audiences from real buyers.
- Write your buyer persona on paper before opening audience targeting — specificity in the persona translates directly into specificity in interest targeting, which reduces cost per click.
- Start your first paid campaign with a Traffic objective at a low daily budget — it’s the lowest-friction way to understand how the Campaign → Ad Set → Ad hierarchy actually works in practice.
- Change only one variable per A/B test — testing audience versus creative simultaneously is one of the most common and expensive beginner mistakes, because you can’t diagnose what caused the result.
- Check CTR first when diagnosing a underperforming ad — a low CTR points to a creative problem; a high CTR with poor conversions points to a landing page or offer problem; knowing the difference saves money.
- Build a content calendar even if your primary focus is paid ads — active organic posting builds Page engagement audiences that become cheaper Custom Audiences in Ads Manager.
- Learn to read ROAS before you try to scale — scaling a campaign that isn’t profitable at small spend just multiplies the loss; the math has to work at $20/day before you justify $200/day.
Leave a Reply