I didn’t go looking for “pelvic alignment” in the abstract—I was trying to stop the annoying loop of hip tightness, low back irritation, and a pelvic floor that felt like it was clenching even when I relaxed.
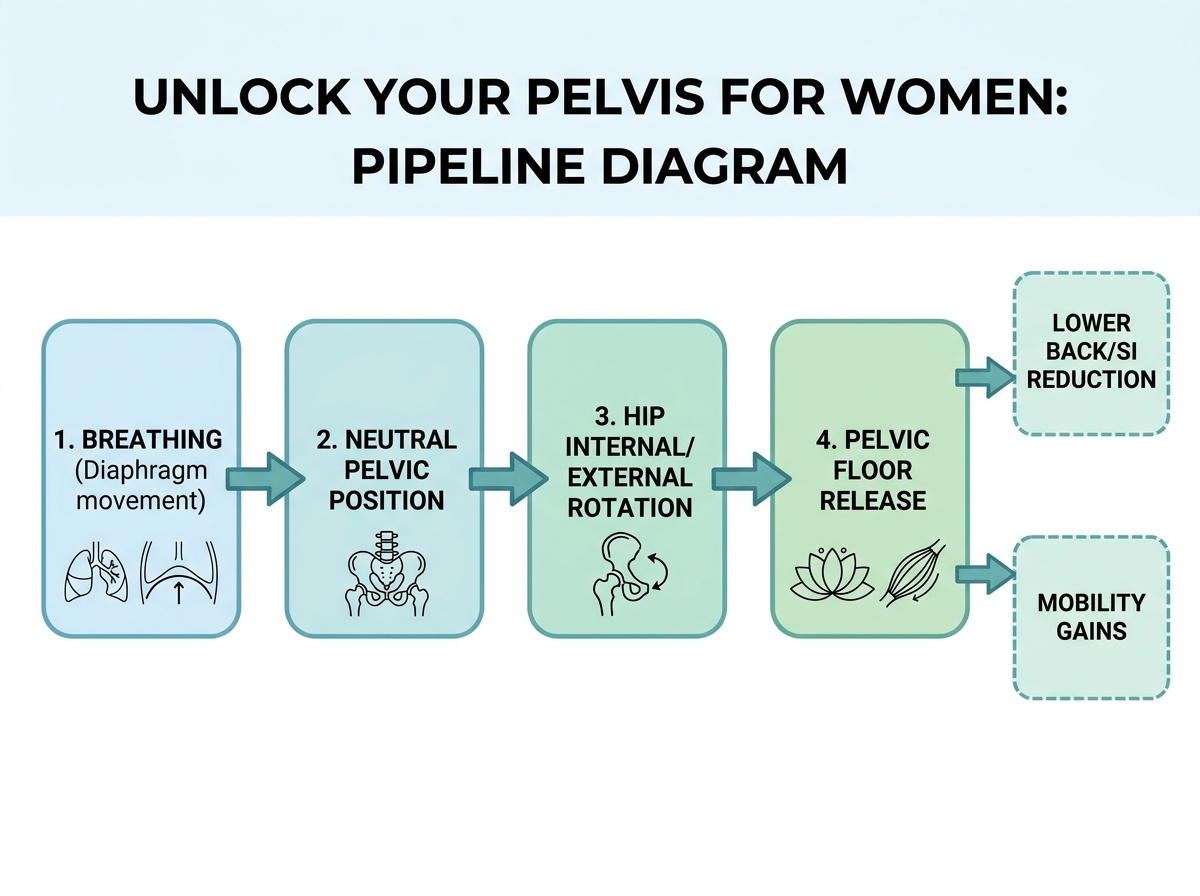
If you’re looking to learn how to unlock your pelvis for women, start with repositioning the pelvic structures through breath and hip rotation rather than jumping straight to Kegels. The biggest difference for me was how indirect the approach felt: I focused on getting the pelvis into a more neutral, supportive position and letting the pelvic floor follow. After that, my lower back and SI area stopped feeling like separate problems I had to “fix” in isolation.
- If your symptoms cluster as low back/SI pain + hip tightness + pelvic floor tightness, you’ll need pelvic positioning and breath first.
- If you expect Kegels to be the answer, the shift is learning how to engage and release without forcing.
- If you can’t tolerate stretching long, start with rotation drills that change how your pelvis moves during daily patterns.
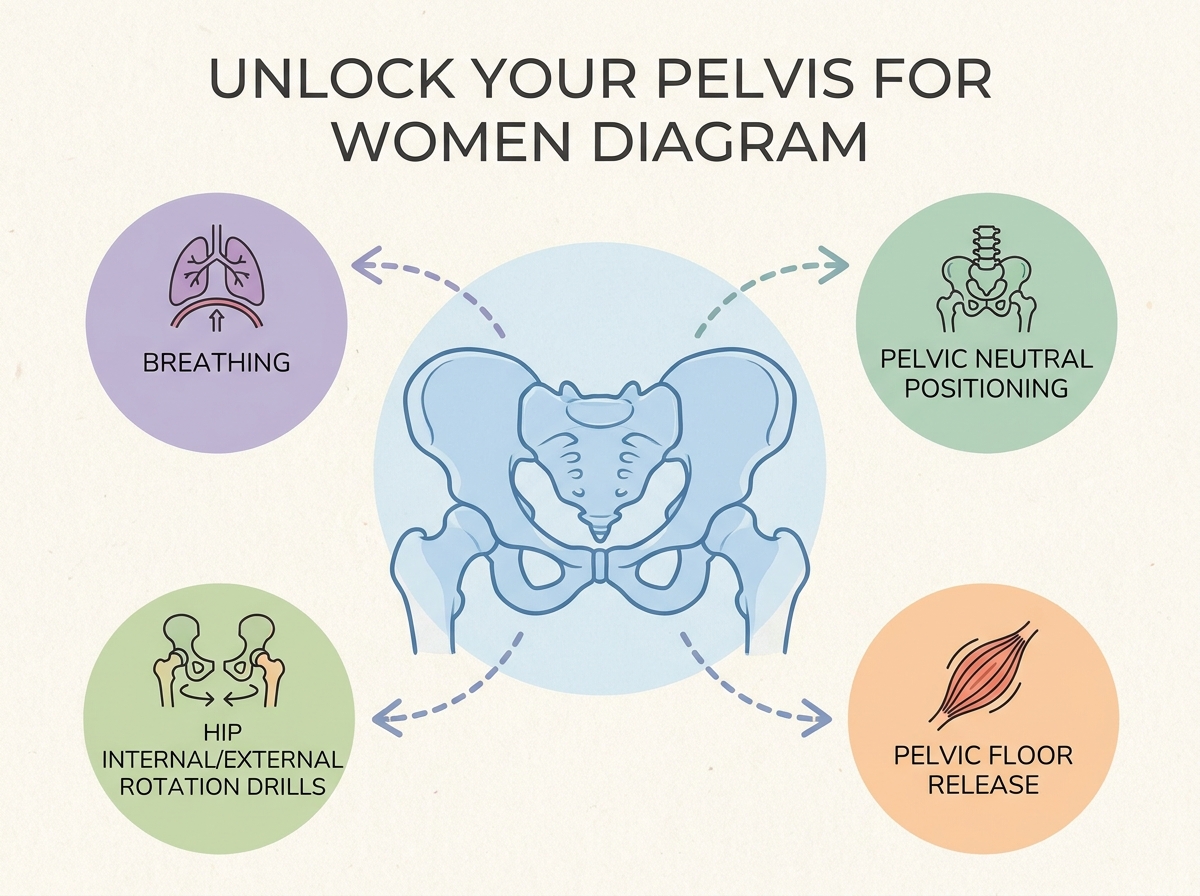
What does “unlock your pelvis” mean?
For many women, “unlock your pelvis” means changing how your pelvis sits and moves so your pelvic floor can stop guarding. Instead of training the pelvic floor directly with repeated squeezing, you restore mobility and coordination around it—especially through hip internal/external rotation and breathing that mobilizes the lower back and abdominal support.
In practice, there are two common tracks:
- “Pelvic floor first” (often Kegels and direct strengthening)
- “Pelvic positioning first” (breath + hip rotation + neutral pelvic orientation, then pelvic floor release follows)
If you’re dealing with lower back or SI joint discomfort alongside pelvic floor tightness, the second track is what finally made mine feel connected.
Sharp insights
Your pelvis can be “neutral” and still feel guarded. Hip rotation drills beat aggressive stretching for many women. Kegels can feel like progress while keeping you tense.
How long does it take?
| Stage | Content | Time |
|---|---|---|
| First relief | Breath + pelvic repositioning basics, noticing change | 1–3 sessions |
| Control and coordination | Rotation drills to restore internal/external ability | 1 week |
| Integrated mobility | Dissociated vs integrated movements, pelvis responds better during transitions | 2 weeks |
| Physio-emotional layer | Stress-to-tension mapping, engage/release without forcing | 3–4 weeks |
| Total estimated time | Full progression to stable, neutral-feeling patterns | 4 weeks |
Order matters more than speed. If you rush to the “hard” exercises, your pelvis usually won’t trust you. Being slower than the estimate is normal when your body has a long history of bracing.
Start with breath and repositioning, not chasing tightness
The first wall I hit was thinking my pelvic floor tightness was a stand-alone issue. I’d try to “stretch more” or “work harder,” and my lower back would complain in that sharp way that makes you wonder if you’re doing damage. What finally shifted my thinking was realizing my pelvis wasn’t just tight—it was oriented in a way that kept my lower back compensating.
When I worked on repositioning the pelvic structures, the change didn’t feel like a dramatic crack or instant freedom. It felt like my body stopped arguing with itself. My hips stopped yanking; my low back stopped acting like the default driver.
The specific moment it clicked for me: I found flexion in my lower back and then learned how to stop that movement from dominating. I didn’t need to eliminate movement—I needed to redirect what it was doing. Once breathing supported that change, my pelvis became easier to place in a more neutral, beneficial position, and the “guarding” sensation softened.

Build hip internal rotation before you try to “feel better”
After the repositioning work, I expected my body to immediately relax. Instead, the tightness moved. It was like my pelvis recalibrated but my hip mobility hadn’t caught up, so the old pattern just relocated from one joint to another.
That’s when I stopped guessing and started working on hip internal and external rotation with purpose. If you’re struggling with hip mobility and pelvic floor tightness at the same time, internal rotation is often the missing link. I found that when internal rotation improved, my pelvis could settle without me forcing it to.
The mistake I almost made was turning rotation drills into stretching contests. I kept it more movement-based than “hold your breath and yank.” Once I promoted internal rotation in a controlled way and improved how my thigh bone moved, my pelvis stopped feeling like it had to compensate through my back.
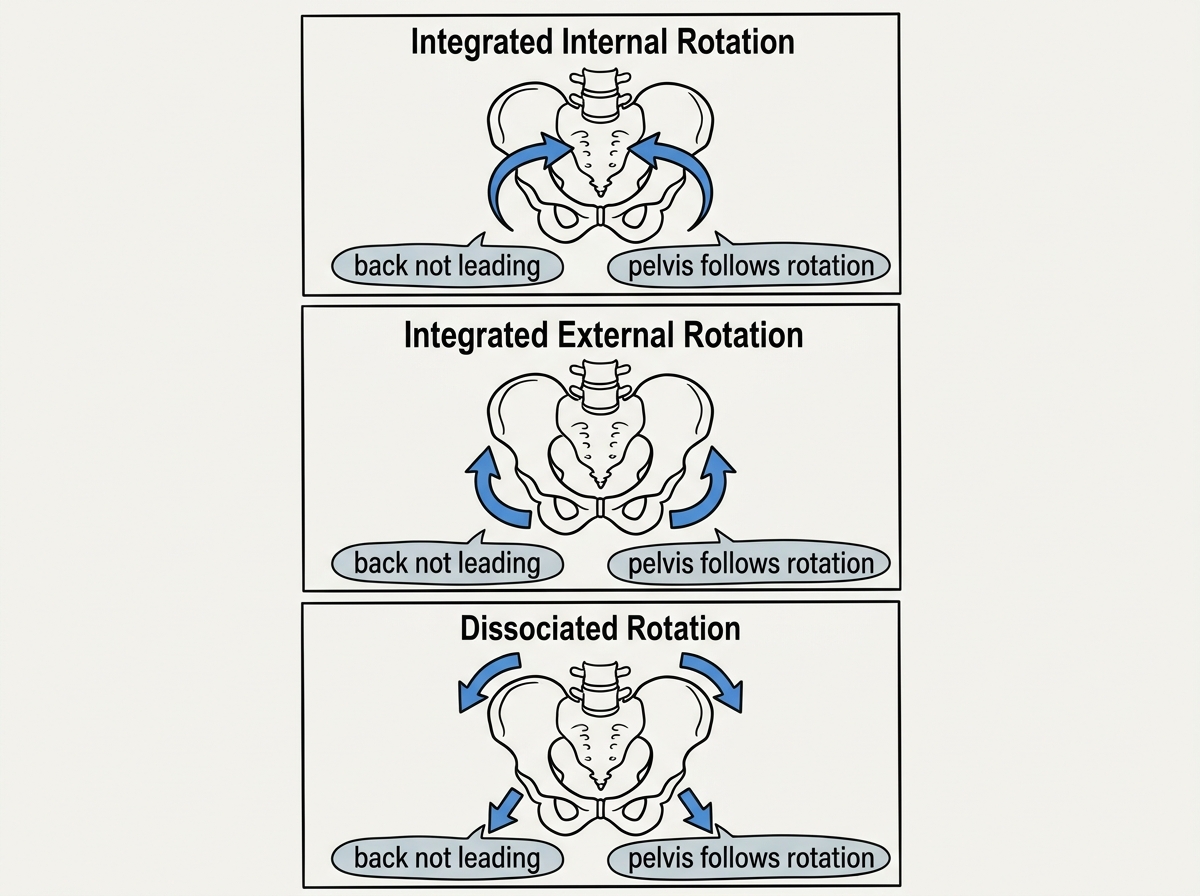
When you learn rotational abilities, your pelvis stops being “stuck”
This part felt weird at first because the exercises didn’t look like what I thought pelvic floor training should look like. I’d see women in videos doing very obvious pelvic squeezes, and my brain kept asking, “So where is the pelvic floor work?”
But here’s what I learned the hard way: pelvic floor function improves when rotational abilities improve enough that the pelvis can move through life patterns without bracing. During these drills, my body started to differentiate what it felt like when rotation was integrated versus when it was dissociated.
The biggest breakthrough for me came when I practiced integrated internal rotation movement and then compared it to dissociated rotation. With dissociation, I could sometimes “feel something” but my pelvis didn’t translate it into stability. With integration, my movement quality improved—my lower back had fewer moments of overwork, and my pelvic area felt less like a locked door.
The biggest mistake people make: forcing the pelvic floor harder
The single biggest mistake people make when learning this topic is trying to override pelvic floor tension with more intensity. I did that for months—more squeezing, more “engagement,” more effort—while my body stayed stuck in a protective pattern.
When you’re stressed or you’ve had trauma, your pelvic floor can act like a seatbelt. It isn’t being difficult; it’s being protective. The problem is that if you treat protection as something to bully, you can strengthen tension instead of releasing it.
What changed everything was learning how to engage and release the pelvic floor in a way that didn’t feel like strain. I started noticing micro-signals—when my breath was shallow, when my ribs and belly were bracing, when my pelvis felt like it was being held in place by the low back. Once I paid attention to those cues, I could downshift on purpose.
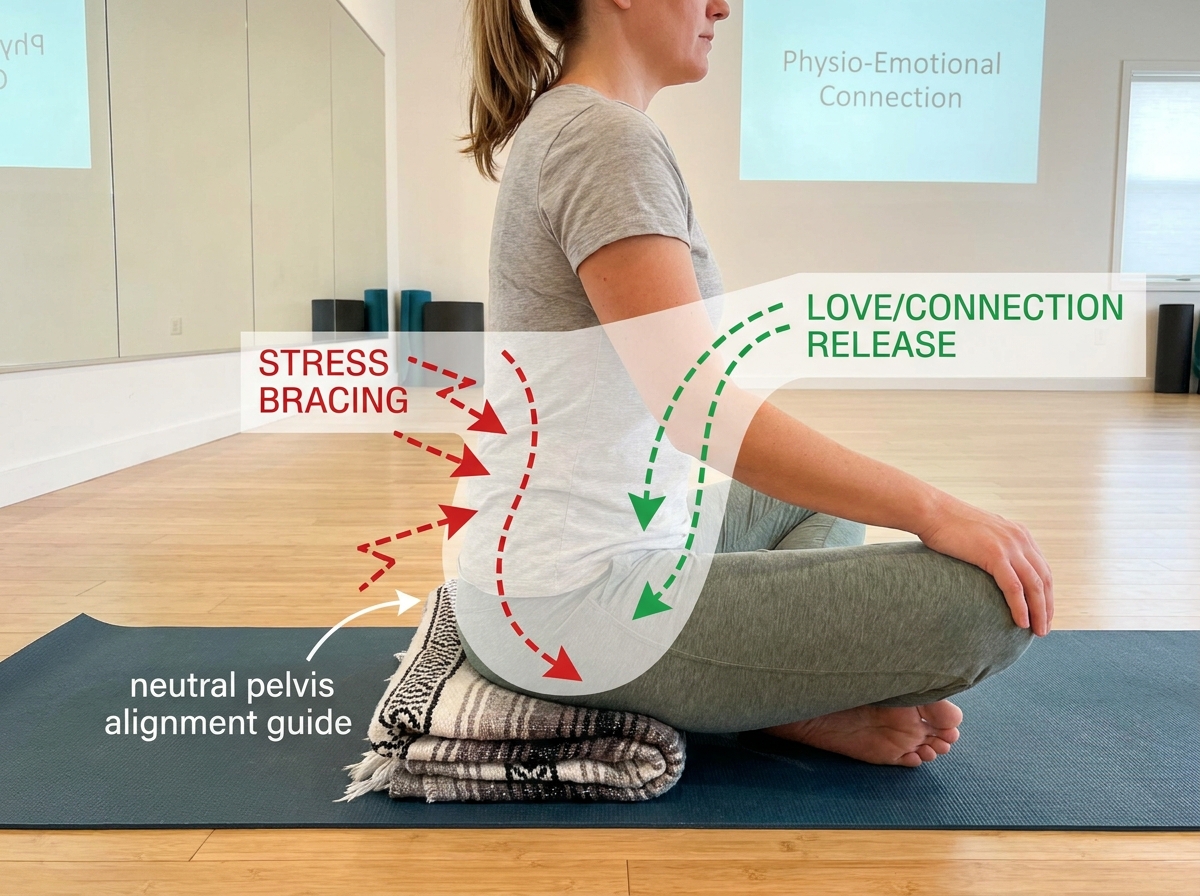
Stress, love, and trauma aren’t “separate” from mechanics
I used to think emotions and pelvic health were two lanes that only met by accident. If I felt anxious, I’d blame my anxiety. If my back hurt, I’d blame my posture. But my body didn’t cooperate with that logic.
As I moved through the later stage, I realized muscle tension, strength, and tightness often carried the emotional signature of my day. When I was braced, my pelvis felt like it was holding a position it didn’t need. When I softened—using breath and a more supportive pelvic orientation—the pelvic area felt safer and more responsive.
This is where I learned to map stress to pelvic patterns instead of treating stress as a random mood. The “from stress & trauma to love & connection” framing finally made sense when my body could feel different during the same movement, just by changing what I let my nervous system do.
And yes, this was not only physical. I noticed a different relationship to my pelvis, not just less pain. The connection felt more kind than clinical.
Turn your new mechanics into daily relief
After the structured progression, the question became: would this actually hold when life got messy? I tested it the way you probably will—after a long day sitting, after a stressful conversation, after traveling when my routine collapses.
What worked best for me wasn’t memorizing exact “moves” as separate tasks. It was recognizing the patterns: when my breathing was shallow, my pelvic positioning drifted; when hip rotation stayed limited, my pelvis couldn’t settle without compensating; when I forced engagement, I rebuilt the same guard.
So I used the drills as a reset, not a punishment. I’d revisit a rotation movement or a repositioning breath cue instead of jumping into intense stretching. Over time, the goal stopped being “perfect neutrality” and became “comfortable neutrality”—a pelvis that didn’t demand that my back do all the work.
If you want a mindset that helps with skills you build in real life, I found How to Learn a Skill Deeply: A Real-World Journey matched how this actually changed me.
Closing reflection and what to do next
I wish I’d started sooner with pelvic positioning and rotation instead of waiting for the pelvic floor to magically behave after I trained it directly. When everything finally connected, it didn’t feel like I “fixed” myself—it felt like I stopped making my body fight me.
Start with breath that supports neutral pelvic orientation. Your pelvis can’t trust “relaxation” if your breathing pattern is still bracing. Practice hip internal rotation as movement, not a stretch hold. Rotation mobility gives your pelvis somewhere stable to land. Compare integrated vs dissociated rotation in real time. If the pelvis doesn’t translate the feeling into movement quality, you haven’t integrated it yet. Use pelvic floor engagement only as a gentle on/off switch. Forcing tension rebuilds the same protective pattern. Watch for low back flexion as a trigger, not a neutral “stretch.” When the back leads, your pelvic floor often tightens to protect. Do a stress check before you train. If you can’t exhale comfortably, your nervous system will hijack the mechanics. Revisit one reset drill after sitting or stress spikes. Small, frequent resets kept my progress from collapsing on busy days. Track what changes your SI/back comfort first. That feedback tells you which mechanical lever matters most for your body.
Leave a Reply